Wormhole Native Token Transfers on Algorand
This guide provides comprehensive technical documentation for implementing Wormhole’s Native Token Transfers (NTT) framework between Algorand and EVM-compatible chains. The implementation enables bidirectional token transfers across heterogeneous blockchain environments through Wormhole’s verified attestation architecture. This guide has been made considering we have an existing Algorand token. So, a new token is deployed on EVM in burning mode. You can deploy in locking/burning mode as per your requirement. The details of which mode you need is covered in this section.
Native Token Transfers (NTT)
Section titled “Native Token Transfers (NTT)”Native Token Transfers (NTT) is Wormhole’s framework for transferring tokens across blockchains without requiring liquidity pools. Unlike traditional token bridges that wrap assets or rely on locked liquidity, NTT enables direct token transfers by either burning tokens on the source chain and minting them on the destination, or by locking tokens on one chain while minting representations on others.
The framework gives integrators complete control over how their tokens behave on each chain, including the token standard, metadata, and supply distribution. This level of control makes NTT particularly valuable for projects that want to maintain native token properties across multiple blockchains while ensuring security through Wormhole’s Guardian network.
Core Components
Section titled “Core Components”Transceiver
Section titled “Transceiver”The Transceiver contract serves as the foundational abstraction for all cross-chain communication within the NTT framework. It defines a standardized interface for sending and receiving messages between chains, independent of the underlying messaging protocol. They sit at the boundary between NTT and an underlying General Messaging Protocol (GMP) such as Wormhole, Axelar, LayerZero, or CCIP.
A transceiver does not understand tokens, balances, or rate limits. Its sole responsibility is to move opaque messages across chains and attest to their receipt. This abstraction allows the NTT framework to remain agnostic to the messaging layer. Wormhole is simply one concrete implementation.
Wormhole Transceiver
Section titled “Wormhole Transceiver”The Wormhole Transceiver represents a concrete implementation of the Transceiver abstraction using the Wormhole messaging protocol. It bridges the generic Transceiver interface with Wormhole’s specific verification model, particularly the Verified Action Approval (VAA) system.
When a Wormhole Transceiver sends a message, it interacts with Wormhole Core to publish a message that will be observed and signed by Wormhole Guardians. This creates a VAA which is a cryptographically verified attestation that a specific action occurred on the source chain. The VAA serves as a decentralized notarization, with signatures from a supermajority of Guardians providing strong security guarantees.
On the receiving side, the Wormhole Transceiver must verify the VAA signatures, check for replay attacks, and validate that the message originates from a known peer contract. This verification process transforms a potentially untrustworthy cross-chain message into a verified fact that can be acted upon with confidence. Each WormholeTransceiver needs to know its counterpart on other chains. This is where we need to configure peer addresses.
Transceiver Manager
Section titled “Transceiver Manager”The Transceiver Manager serves as the central coordination point for all cross-chain messaging within an NTT deployment. Its primary function is managing the relationship between MessageHandlers (like NttManager) and their configured Transceivers, while tracking attestations for received messages.
This design enables multi-transceiver security. A message handler can require attestations from one or many transceivers before a message is considered valid. This makes it possible to combine multiple GMPs or verification backends for stronger guarantees.
Message Handler
Section titled “Message Handler”The Message Handler abstract contract provides the scaffolding for executing cross-chain messages once they’ve been sufficiently verified. It defines the critical lifecycle methods for message approval and execution, while leaving message-specific logic to concrete implementations.
It encapsulates the threshold logic, checking whether a message has received enough attestations from distinct Transceivers. It then carries out the actual business logic once approval conditions are met. This separation ensures that verification and execution remain distinct phases, preventing premature execution of unverified messages.
NttManager
Section titled “NttManager”The NTT Manager is the central orchestrator of all token transfers and sits at the heart of the NTT system. When a user wants to transfer tokens cross-chain, they interact exclusively with the NTT Manager, which handles everything from rate limiting to message creation.
The manager’s first responsibility is enforcing rate limits, which protect against potential exploits by limiting how many tokens can move in or out within a given time period. If a transfer exceeds the current capacity, the manager can either reject it or place it in a queue, depending on configuration. This queuing system ensures that even during high-volume periods, transfers can eventually complete once capacity refills.
Beyond rate limiting, the NTT Manager creates unique message identifiers for each transfer by maintaining a sequence counter. This sequence, combined with the source chain ID and contract address, ensures every message can be uniquely identified throughout its lifecycle. The manager also maintains a registry of peer NTT Managers on other chains, knowing exactly where to send messages and from where to accept them.
When receiving messages from other chains, the NTT Manager verifies that sufficient attestations have been collected before executing the transfer. It checks with the Transceiver Manager to confirm that the required number of Transceivers have verified the incoming message. Only after this verification does it call the NTT Token contract to mint or unlock tokens for the recipient.
NttToken
Section titled “NttToken”The NTT Token contract manages the actual token supply and is the lowest level of the NTT architecture. Its behavior differs significantly between Algorand and EVM chains due to fundamental differences in how these platforms handle tokens.
On Algorand, tokens exist as Algorand Standard Assets (ASAs) that are natively integrated into the protocol layer. The NTT Token contract doesn’t implement the token itself but rather controls the supply of an ASA. In burning mode, the ASA is created within the NTT Token contract, meaning the entire supply initially sits in the contract’s account. In locking mode, the ASA already exists externally, and the NTT Token contract receives tokens when they need to be locked.
On EVM chains, the NTT Token contract is an ERC-20 implementation. In burning mode, it includes mint and burn functions that the NTT Manager can call. In locking mode, it’s typically an existing ERC-20 contract, and the NTT Manager holds tokens on behalf of users who have transferred them to other chains.
The critical point is that after deployment, both modes function identically from the transfer perspective. Whether tokens are being burned or locked, the user experience is the same: tokens go into the NTT Token contract when leaving the chain and come out when arriving. The distinction is semantic and affects how circulating supply is calculated, but not the actual mechanics of transfers.
Message Lifecycle
Section titled “Message Lifecycle”The lifecycle of a message can be broken down into two stages:
- Initiating the transfer on the source chain by locking/burning the token.
- Completing the transfer on the destination chain by unlocking/minting the token.
Initiation Phase
Section titled “Initiation Phase”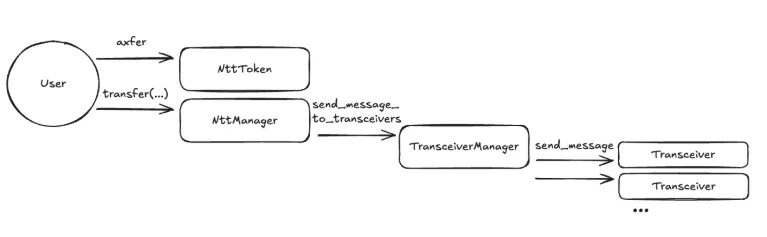
The transfer process begins when a user wants to move tokens from one chain to another. On Algorand, the user creates a transaction group that includes both a call to the NTT Manager’s transfer function and an asset transfer that sends the tokens to the NTT Token contract. On EVM chains, the user must first approve the NTT Manager to spend their tokens, then call the transfer function.
The NTT Manager immediately checks its rate limit to determine if the transfer can proceed. If capacity is sufficient, the manager calls the NTT Token contract to lock or burn the tokens. The tokens are removed from circulation on the source chain before any message is sent to the destination chain. In burning mode, this reduces the total supply. In locking mode, it moves the tokens into the NTT Token contract’s custody. With the tokens secured, the NTT Manager creates a message containing all transfer details.
The message goes to Wormhole Core, which emits an event that Guardian nodes observe. The Guardians independently validate that the event came from a legitimate source and sign it. Once the threshold of signatures is reached, the VAA becomes available for anyone to query from Wormhole’s network. The transaction succeeds, the user receives a message ID for tracking, and the tokens have been removed from the source chain.
Completion Phase
Section titled “Completion Phase”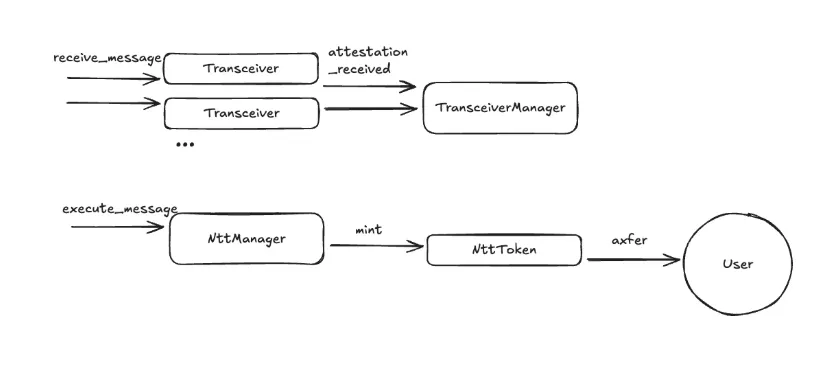
Completion on the destination chain happens in two distinct phases:
The first phase is message reception and attestation. A relayer retrieves the VAA from Wormhole’s network and submits it to the Wormhole Transceiver on the destination chain. The Transceiver first calls Wormhole Core to verify the VAA’s Guardian signatures. The Transceiver also checks that the message came from a known peer Transceiver on the source chain and VAA hasn’t been processed before by checking its hash against a registry of seen messages. This replay protection ensures the same transfer can’t be executed multiple times. The Transceiver Manager records this attestation, associating it with the message digest.
The second phase is message execution. Once threshold has been met, the relayer, the recipient, or any third party, calls the NTT Manager which verifies the message hasn’t been executed already and the message came from a known peer NTT Manager on the source chain.
Rate limiting is checked on the destination chain and if it passes, the NTT Manager calls the NTT Token contract’s mint function, passing the recipient address and amount. In burning mode, this creates new tokens. In locking mode, it transfers existing tokens from the contract’s custody. The tokens appear in the recipient’s account, completing the transfer. The transfer is now complete end-to-end.
Choosing the Right Deployment Path
Section titled “Choosing the Right Deployment Path”One of the most important design decisions when adopting NTT is whether you are working with a new token or an existing token. NTT is flexible enough to support both existing tokens and brand new multichain-native tokens. The main tool for this is the choice between locking and burning mode on each chain.
- If You Have an Existing Token on Algorand (ASA)
- Algorand should use locking mode:
- NttToken is configured to hold the existing ASA when users transfer cross-chain.
- The original ASA continues to be the “canonical” representation of your token.
- All initial supply is on Algorand, and other chains get supply only when Algorand locks some of its ASA balance and mint or unlock on the other chains.
- All other chains should use burning mode:
- On each destination chain, you deploy an NttToken that either wraps a newly created token or directly manages it.
- The supply on each destination chain increases only when Algorand has locked the corresponding amount.
- If You Have an Existing Token on an EVM Chain (ERC-20)
- The chain with the existing ERC-20 should use locking mode:
- NttToken holds locked ERC-20 balances when users bridge out.
- The original ERC-20 contract remains the canonical representation.
- All initial supply starts and conceptually lives on that chain.
- All other chains, including Algorand, should use burning mode:
- Algorand gets an NttToken that manages an ASA in
burningmode. - Supply on Algorand increases only when tokens have been locked on the origin chain.
- Algorand gets an NttToken that manages an ASA in
- If You Are Creating a New Token
- Every chain uses burning mode:
- On Algorand, NttToken creates a new ASA and holds the supply.
- On each EVM chain, NttToken deploys a new ERC-20 or equivalent managed token.
- You decide how to distribute the initial supply across chains: mint everything on one chain and move it out via NTT, or mint portions on multiple chains according to your distribution plan.
Prerequisites
Section titled “Prerequisites”- Node.js v18.0+
- npm v9.0+
- Bun v1.2.23
- Python 3.12+
- Foundry latest
- AlgoKit latest
- Puya Compiler v5.3.2
Required Accounts & Credentials
Section titled “Required Accounts & Credentials”Algorand Testnet
Section titled “Algorand Testnet”- Account with funds: Minimum 10 ALGO for contract deployment and testing
- Save Account mnemonic: 25-word recovery phrase. This will be used later while bridging.
EVM Chain
Section titled “EVM Chain”- Wallet with ETH: Minimum 0.05 ETH for deployment and testing
- Save Private key which is 64-character hex string. This will also be used later while bridging.
- Basescan API key: From sepolia.basescan.org/apis
Obtain Testnet Funds
Section titled “Obtain Testnet Funds”- ETH Faucets: Get some Base Sepolia Tokens using Coinbase Faucet (
Recommended- gives 0.05-0.1 ETH). Other alternatives available are:
- Algorand Testnet ALGO: Get some Algorand testnet tokens using Algorand Testnet Dispenser
Algorand Deployment
Section titled “Algorand Deployment”Clone contract and install dependencies
Section titled “Clone contract and install dependencies”# Clone Folks Finance NTT Contracts repositorygit clone https://github.com/Folks-Finance/algorand-ntt-contracts.gitcd algorand-ntt-contracts
# Create Python virtual environmentpython3 -m venv venvsource venv/bin/activate # On Windows: venv\Scripts\activate
# Install Python dependenciespip install -r requirements.txt
# Install Node.js dependenciesnpm installBuild Contracts
Section titled “Build Contracts”Generate TEAL code, ARC56 specs, and TypeScript clients
npm run buildThis generates artifacts in the specs/ folder:
*.approval.teal- Contract approval programs*.clear.teal- Contract clear state programs*.arc56.json- Contract interface specifications- TypeScript client files for contract interaction
Configure Deployment
Section titled “Configure Deployment”Update the .env file:
ALGORAND_TESTNET_ACCOUNT_MNEMONIC="your twenty five word mnemonic phrase here ..."Deploy Contracts
Section titled “Deploy Contracts”Deploy NttToken Contract
Section titled “Deploy NttToken Contract”Option A: For a New ASA (Creating a new token)
npm run script deployment/deployNewToken.tsOption B: For an Existing ASA (Using an existing Algorand token)
npm run script deployment/deployExistingToken.tsExpected Output:

Post-Deployment
Section titled “Post-Deployment”For existing token, transfer entire non-circulating supply(apart from tokens you want to send during bridging) to NttToken contract
algokit goal asset send \ --from <YOUR_ADDRESS> \ --to <NTT_TOKEN_APP_ADDRESS> \ --assetid <ASA_ID> \ --amount <TOTAL_SUPPLY>For existing token (optional), update the ASA reserve address to be the NttToken contract address
algokit goal asset config \ --assetid <ASA_ID> \ --manager <YOUR_ADDRESS> \ --reserve <NTT_TOKEN_APP_ADDRESS>Deploy NttManager Contract
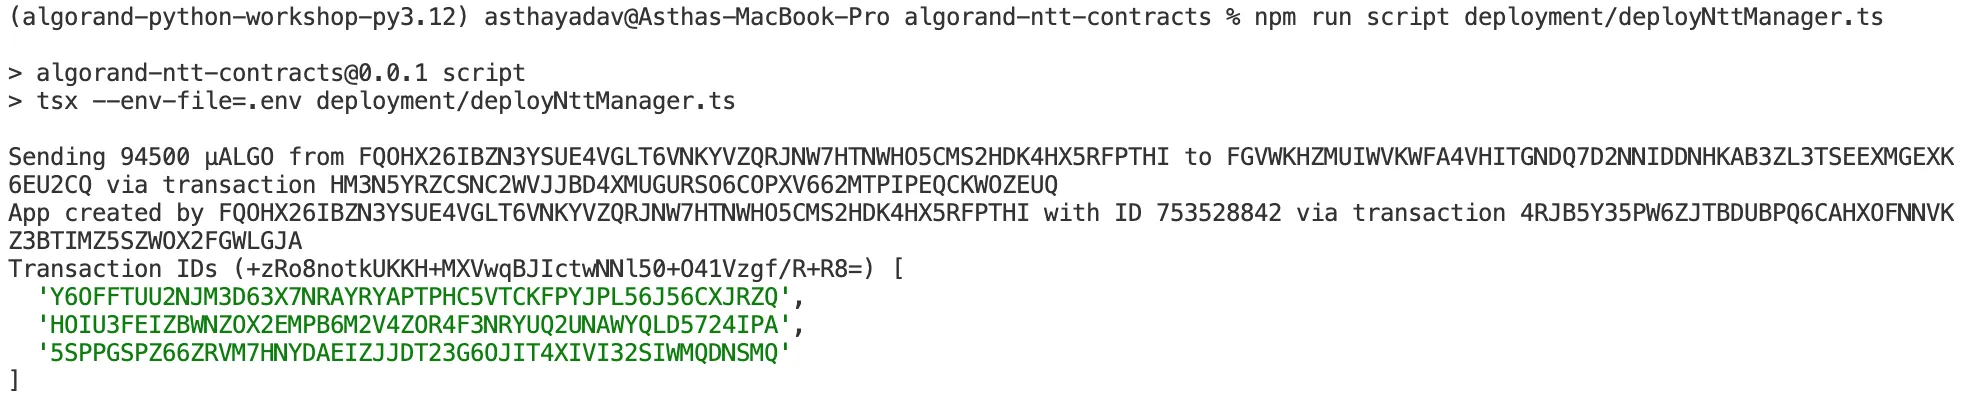
Section titled “Deploy NttManager Contract”npm run script deployment/deployNttManager.tsExpected Output:
Deploy WormholeTransceiver Contract
Section titled “Deploy WormholeTransceiver Contract”npm run script deployment/deployWormholeTransceiver.tsExpected Output:

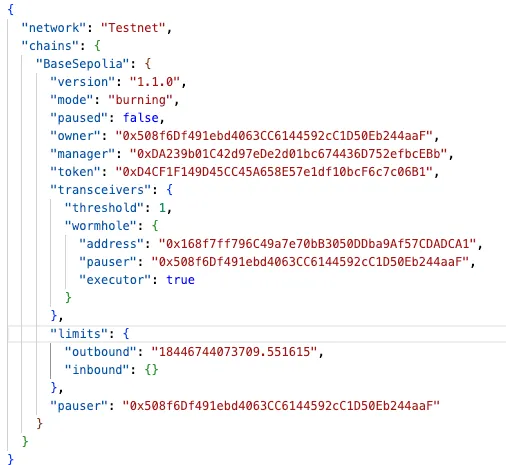
Record Deployment Addresses
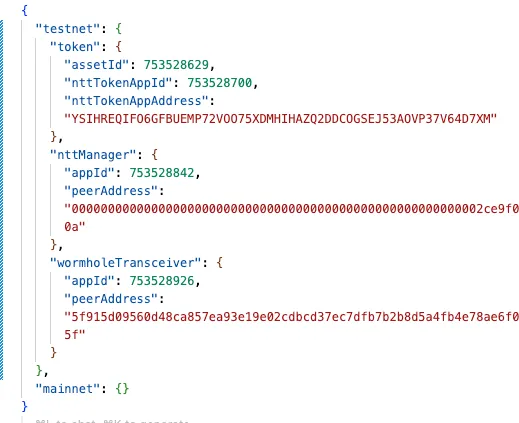
Section titled “Record Deployment Addresses”After deployment, check deployment/out/contracts.json. The testnet should be populated with token, nttManager and wormholeTransceiver details.
EVM Testnet Deployment
Section titled “EVM Testnet Deployment”Install NTT CLI
Section titled “Install NTT CLI”# Clone NTT repositorygit clone --branch 'v1.6.0+cli' --single-branch --depth 1 \ https://github.com/wormhole-foundation/native-token-transfers.git
cd native-token-transfers
# Install Bun (if not already installed)curl -fsSL https://bun.sh/install | bash -s "bun-v1.2.23"
# Install dependenciesnpm ci
# Install NTT CLI globallycd cli./install.sh
# Verify installationntt --versionCreate NTT Project
Section titled “Create NTT Project”cd ~ # Or your preferred workspacentt new my-ntt-deploymentcd my-ntt-deployment
# Initialize for testnetntt init TestnetDeploy ERC20 Token
Section titled “Deploy ERC20 Token”Clone EVM Example NTT Token
Section titled “Clone EVM Example NTT Token”git clone https://github.com/wormhole-foundation/example-ntt-token-evm.gitcd example-ntt-token-evmforge installConfigure Token Parameters
Section titled “Configure Token Parameters”Ensure token parameters match Algorand ASA and vice versa.
ASSET_NAME=<YOUR_ASSET_NAME>UNIT_NAME=<YOUR_ASSET_UNIT_NAME>DECIMALS=6 # Must match ASA decimalsDEPLOYER_ADDRESS=<YOUR_EVM_ADDRESS>OWNER_ADDRESS=<YOUR_EVM_ADDRESS> # Can be same as deployerOverride Decimals Function (If Needed)
Section titled “Override Decimals Function (If Needed)”Alternatively, if your token requires non-standard decimals (not 18), add to PeerToken.sol:
function decimals() public view virtual override(ERC20) returns (uint8) { return 6; // Match your ASA decimals}Deploy Token Contract
Section titled “Deploy Token Contract”forge create --rpc-url https://sepolia.base.org \ --private-key $EVM_TESTNET_PRIVATE_KEY \ src/PeerToken.sol:PeerToken \ --broadcast \ --constructor-args "$ASSET_NAME" "$UNIT_NAME" $DECIMALS $DEPLOYER_ADDRESS $OWNER_ADDRESSExpected Output:

Save the deployed token address!
Deploy NTT Infrastructure
Section titled “Deploy NTT Infrastructure”Configure Contract Verification (Optional)
Section titled “Configure Contract Verification (Optional)”For production deployments with verified contracts:
ntt config set-chain BaseSepolia verifier etherscanntt config set-chain BaseSepolia scan_api_key $BASESCAN_API_KEY
# Verify configurationntt config get-chain BaseSepolia scan_api_key
Deploy NTT Contracts
Section titled “Deploy NTT Contracts”Without Verification:
ntt add-chain BaseSepolia \ --latest \ --mode burning \ --token $YOUR_EVM_TOKEN_ADDRESS \ --skip-verifyWith Verification:
ntt add-chain BaseSepolia \ --latest \ --mode burning \ --token $YOUR_EVM_TOKEN_ADDRESSVerify Deployment
Section titled “Verify Deployment”ntt statusExpected Output:
Record Deployment Addresses
Section titled “Record Deployment Addresses”Check deployment.json in your NTT project. You should be able to see details of your deployed token.
Save the addresses you get in your deployment.json file for peer configuration!
Cross-Chain Configuration
Section titled “Cross-Chain Configuration”Configure Base Sepolia → Algorand Peering
Section titled “Configure Base Sepolia → Algorand Peering”Copy the below addresses
- From Base Sepolia (
deployment.json):NttManagerandWormholeTransceiver - From Algorand (
deployment/out/contracts.json):nttManager.peerAddressandwormholeTransceiver.peerAddress
Set NttManager Peer on Base Sepolia
Section titled “Set NttManager Peer on Base Sepolia”export PEER_ADDRESS=<YOUR_PEER_ADDRESS>export TOKEN_DECIMALS=6 #Token decimals (MUST match ASA)export NTTMANAGER=<YOUR_NTT_MANAGER>
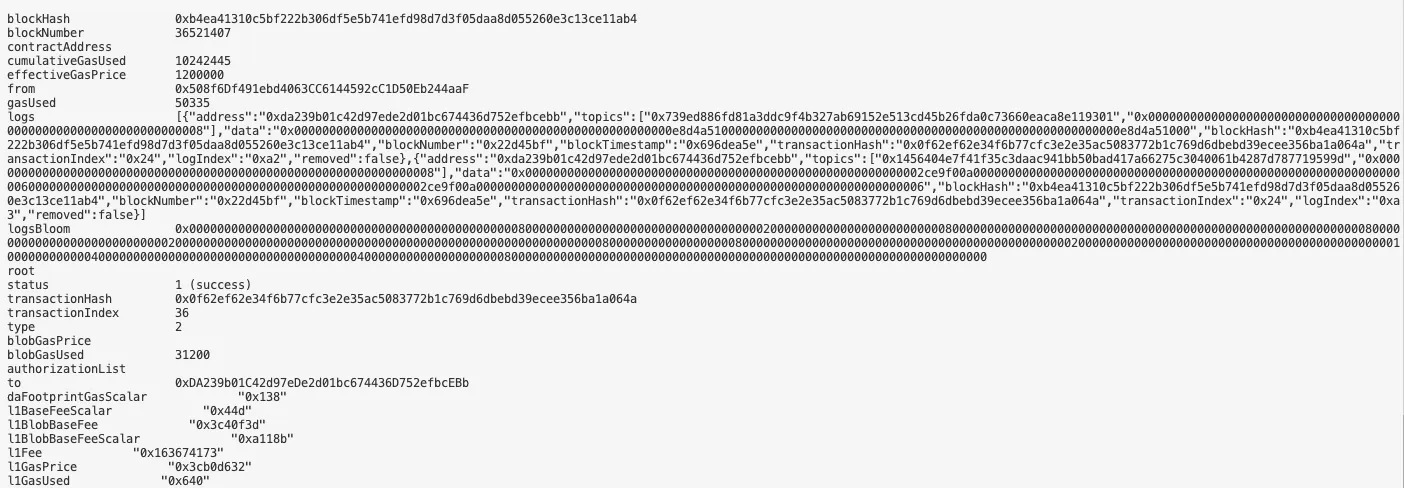
cast send $NTTMANAGER \ "setPeer(uint16,bytes32,uint8,uint256)" \ 8 \ # Algorand's Wormhole chain ID $PEER_ADDRESS \ $TOKEN_DECIMALS \ 1000000000000 \ --rpc-url https://sepolia.base.org \ --private-key $EVM_TESTNET_PRIVATE_KEYExpected Output:
Set WormholeTransceiver Peer on Base Sepolia
Section titled “Set WormholeTransceiver Peer on Base Sepolia”cast send $WORMHOLE_TRANSCEIVER \ "setWormholePeer(uint16,bytes32)" \ 8 \ $WORMHOLE_TRANSCEIVER_PEER_ADDRESS \ --rpc-url https://sepolia.base.org \ --private-key $EVM_TESTNET_PRIVATE_KEYOnce you set you can verify it using the below command:
cast call $WORMHOLE_TRANSCEIVER \ "getWormholePeer(uint16)(bytes32)" \ 8 \ --rpc-url https://sepolia.base.orgExpected Output:

Configure Algorand → Base Sepolia Peering
Section titled “Configure Algorand → Base Sepolia Peering”Edit peers in algorand-ntt-contracts/deployment/configure.ts:
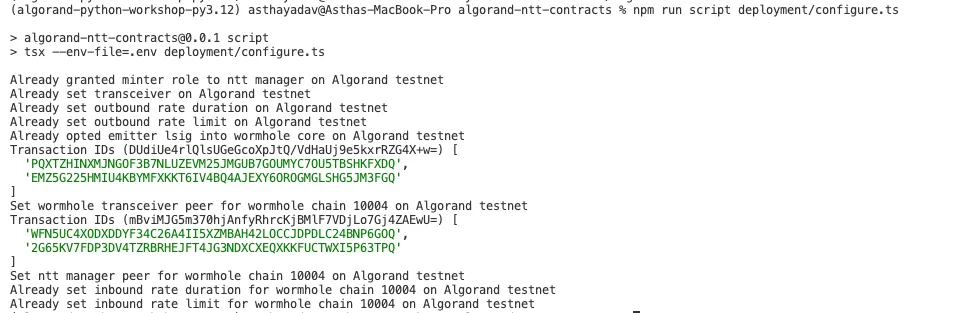
const peers: NttPeerChain[] = [ { wormholeChainId: 10004, // Base Sepolia's Wormhole chain ID nttManager: <PADDED_NTT_MANAGER_ADDRESS>, wormholeTransceiver: <PADDED_WORMHOLE_TRANSCEIVER_ADDRESS>, },];Apply Configuration
Section titled “Apply Configuration”cd algorand-ntt-contractsnpm run script deployment/configure.tsExpected Output:
SDK Integration & Testing
Section titled “SDK Integration & Testing”Build NTT SDK
Section titled “Build NTT SDK”# Clone the SDK repositorygit clone https://github.com/Folks-Finance/wormhole-ntt-sdk.gitcd wormhole-ntt-sdk
# Install dependenciesnpm install
# Build the SDKnpm run buildConfigure Custom Token
Section titled “Configure Custom Token”Go to examples/constants.ts file. Update your token details and contract addresses in CUSTOM_NTT_TOKEN_TESTNET_ID, CUSTOM_NTT_TOKEN_TESTNET_AVM and CUSTOM_NTT_TOKEN_TESTNET_EVM.
Use Transfer Script
Section titled “Use Transfer Script”Transfer from AVM to EVM
Section titled “Transfer from AVM to EVM”For transferring from avm to evm use examples/transfer-avm-to-evm-custom-token.ts. Update destChain according to the EVM testnet you are using. Since we are using base sepolia, we will update:
const destChain = TESTNET_FOLKS_CHAIN_ID.BASE_SEPOLIA;Update YOUR_EVM_ADDRESS to the address you want to send the tokens as well as the amount(default is 1 TOKEN) to in convertToGenericAddress. This transfer function will transfer the TOKENS from Algorand to your configured EVM chain.
const prepareCall = await FolksBridge.prepare.transfer( CUSTOM_NTT_TOKEN_TESTNET_ID, 1_000_000n, destChain, convertToGenericAddress(<YOUR_EVM_ADDRESS>, ChainType.EVM), capabilities, quote, feePaymentToken );In case you don’t have FOLKS token to pay fees, you can update feePaymentToken to use native ALGO for fee payment
const feePaymentToken = { tokenType: TokenType.GAS, tokenSymbol: 'ALGO', tokenDecimals: 6,};Transfer from EVM to AVM
Section titled “Transfer from EVM to AVM”To transfer from evm to avm use examples/transfer-evm-to-avm-custom-token.ts.
Update chain, sourceChain and folksChainId according to the EVM testnet you are using. Since we are using base sepolia, we will update:
const chain = baseSepolia;const folksChainId = TESTNET_FOLKS_CHAIN_ID.BASE_SEPOLIA;const sourceChain = TESTNET_FOLKS_CHAIN_ID.BASE_SEPOLIA;Update YOUR_AVM_ADDRESS to the address you want to send the tokens as well as the amount(default is 1 TOKEN) to in convertToGenericAddress. This transfer function will transfer the TOKENS from configured EVM chain to Algorand.
const prepareCall = await FolksBridge.prepare.transfer( CUSTOM_NTT_TOKEN_TESTNET_ID, 1_000_000n, destChain, convertToGenericAddress(<YOUR_AVM_ADDRESS>, ChainType.AVM), capabilities, quote, feePaymentToken, );In case you don’t have FOLKS token to pay fees, you can update feePaymentToken to use native ETH token for fee payment
const feePaymentToken = { tokenType: TokenType.GAS, tokenSymbol: 'ETH', tokenDecimals: 18,};Environment Variable Template
Section titled “Environment Variable Template”copy the .env.example to .env file and update the private key for EVM Testnet and add Algorand Testnet Mnemonic:
EVM_TESTNET_PRIVATE_KEY=<YOUR_EVM_PRIVATE_KEY>ALGORAND_TESTNET_ACCOUNT_MNEMONIC=<YOUR_ALGORAND_TESTNET_ACCOUNT_MNEMONIC>Pre-Transfer Checklist
Section titled “Pre-Transfer Checklist”Before running AVM to EVM transfer, ensure:
- Your Algorand Account has at least 10 ALGO
- You have enough custom ALGO token you want to send(excluding MBR)
- Set minter role to NTT Manager Address
cast send $YOUR_EVM_TOKEN_ADDRESS "setMinter(address)" $NTT_MANAGER_ADDRESS --rpc-url https://sepolia.base.org --private-key $EVM_TESTNET_PRIVATE_KEYto mint tokens for yourEVM_TESTNET_ADDRESSon destination chain.
Before running EVM to AVM transfer, ensure:
- At least 0.002 ETH (0.0015 for bridge fee + 0.0005 for gas)
- You have enough custom ETH token you want to send
- Must approve Folks Bridge contracts. If using other EVM chains, get the
NTT_EXECUTOR_ADDRESSfromnttWithExecutor.tsfile:cast send $YOUR_EVM_TOKEN_ADDRESS "approve(address,uint256)" $BASE_SEPOLIA_NTT_EXECUTOR_ADDRESS $AMOUNT --rpc-url https://sepolia.base.org --private-key $EVM_TESTNET_PRIVATE_KEY - Must approve NTTManager. Get
$MANAGERaddress of EVM testnet fromdeployment.jsonfile:cast send $YOUR_EVM_TOKEN_ADDRESS "approve(address,uint256)" $MANAGER $AMOUNT --rpc-url https://sepolia.base.org --private-key $EVM_TESTNET_PRIVATE_KEY - Opt-in to ASA to receive assets on Algorand
Execute Transfer
Section titled “Execute Transfer”Run the below command to transfer from evm to avm:
npx env-cmd tsx examples/transfer-evm-to-avm-custom-token.ts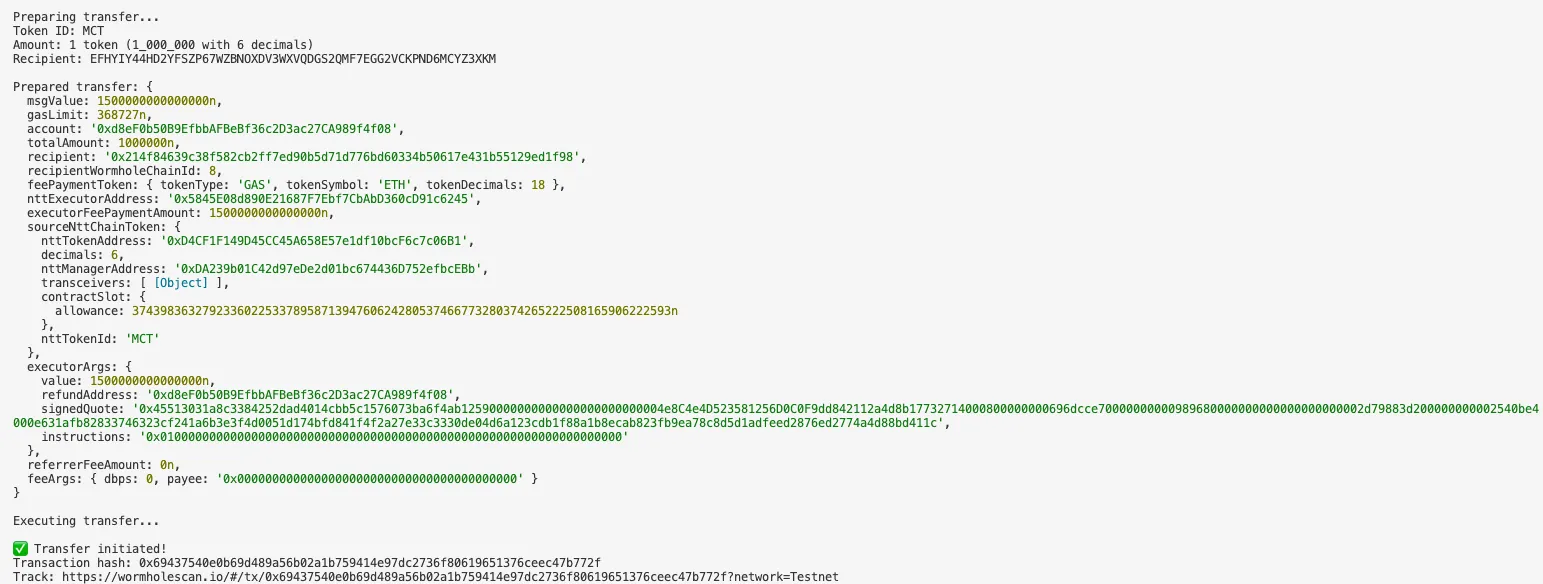
Alternatively, you could use below command to transfer from avm to evm:
npx env-cmd tsx examples/transfer-avm-to-evm-custom-token.ts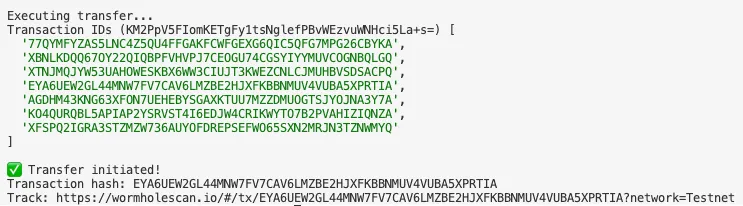
Monitor Transfer Status
Section titled “Monitor Transfer Status”Via WormholeScan
Section titled “Via WormholeScan”Visit: https://wormholescan.io/#/tx/{YOUR_TX_HASH}?network=Testnet
Transfer Stages:
- Source Finalized - Transaction confirmed on Source Chain
- Guardian Signed - Wormhole guardians created VAA
- Transfer Finalized - Transfer tokens to Destination Chain
- Successful - Tokens transferred on Destination Chain to user account
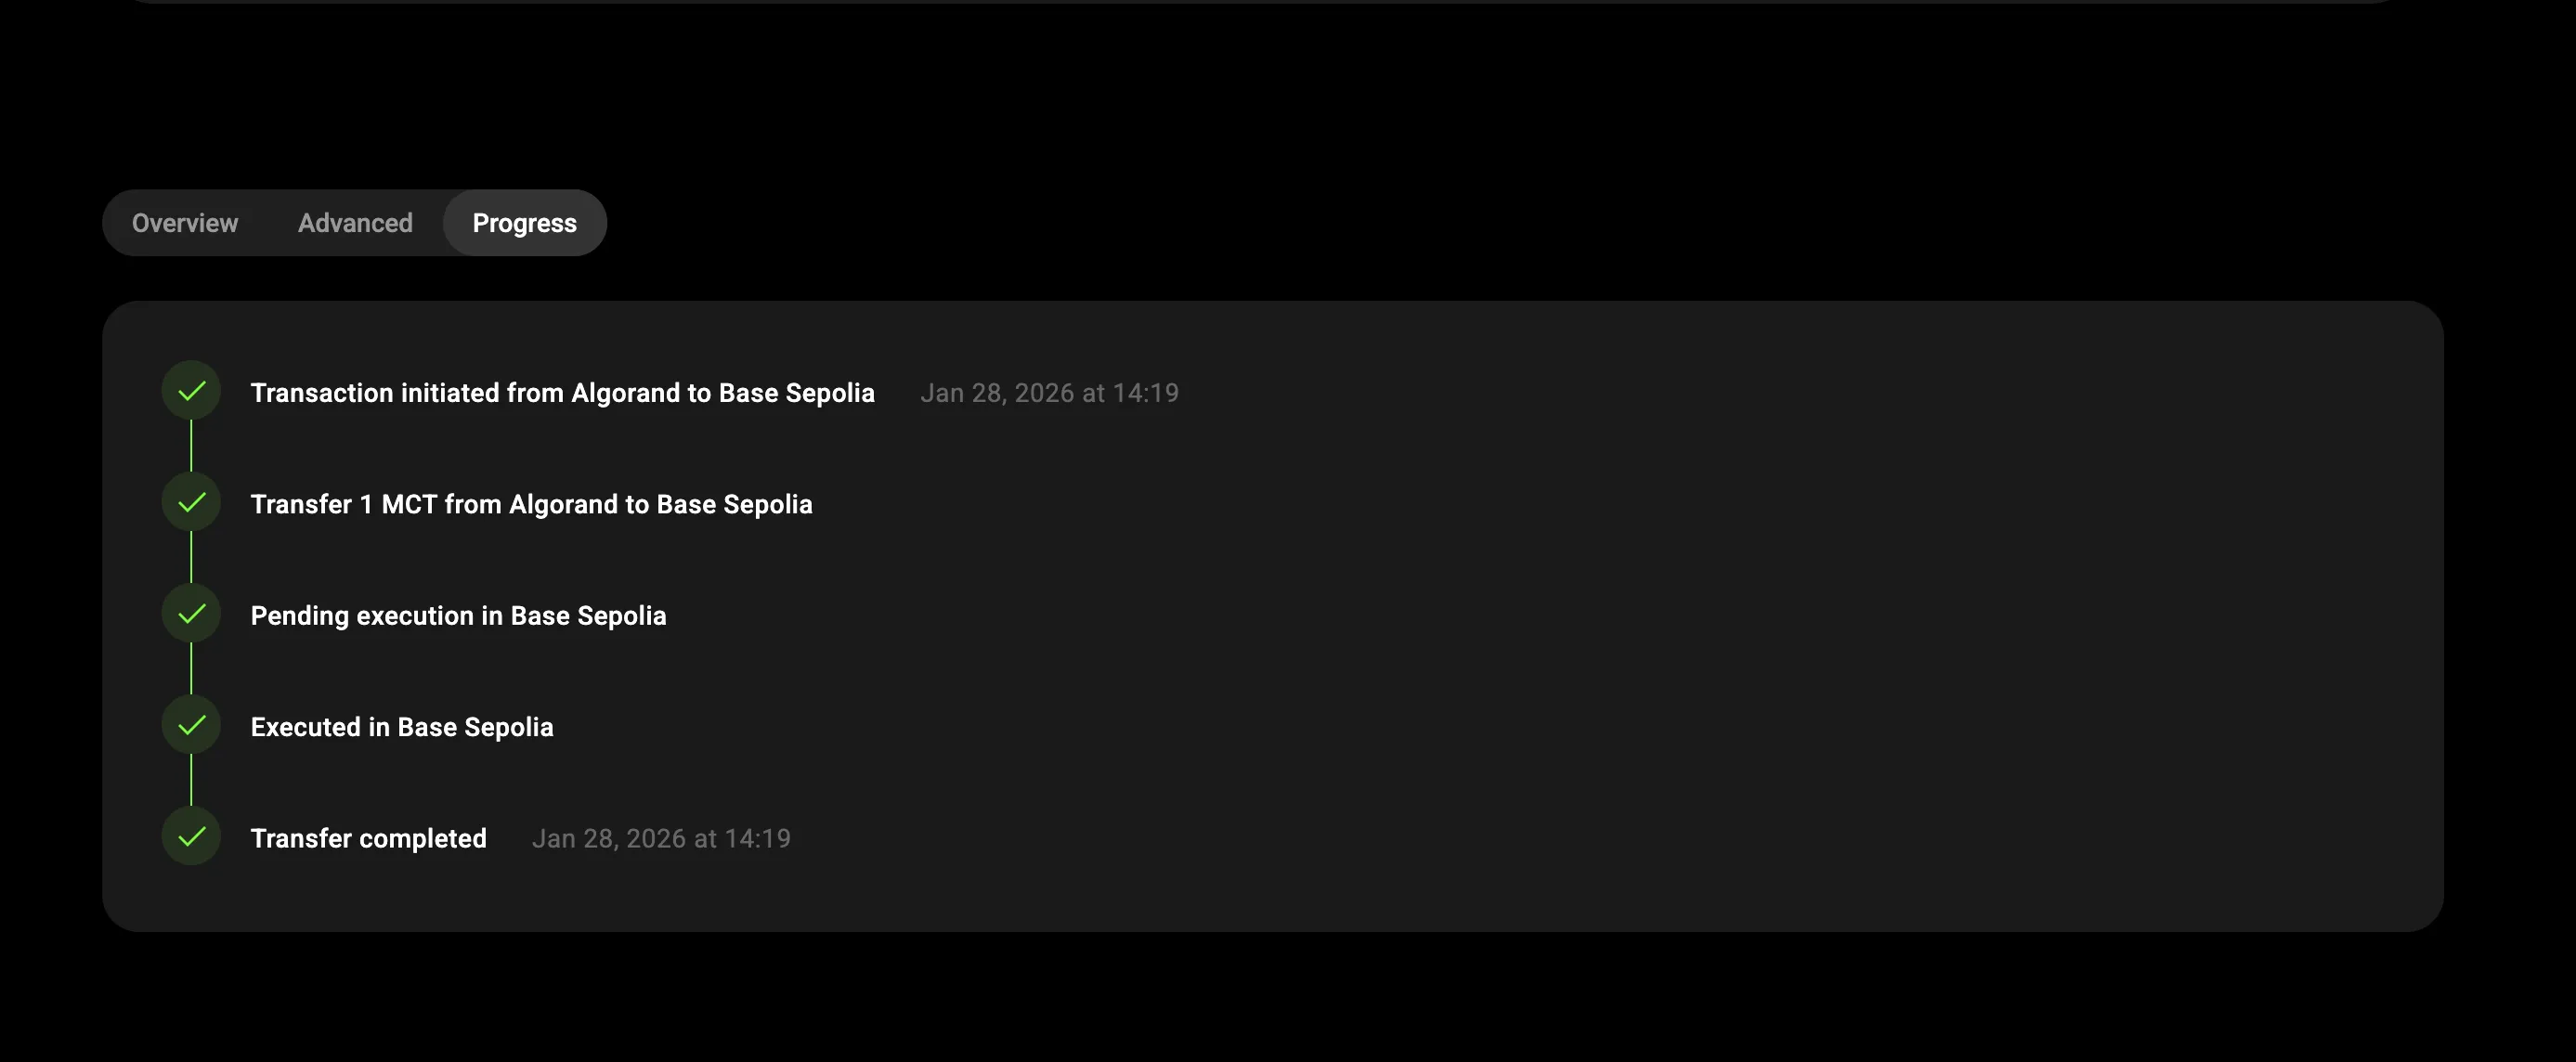
On completion the transaction status will change to successful. You should now be able to see the tokens being received in the destination account address.
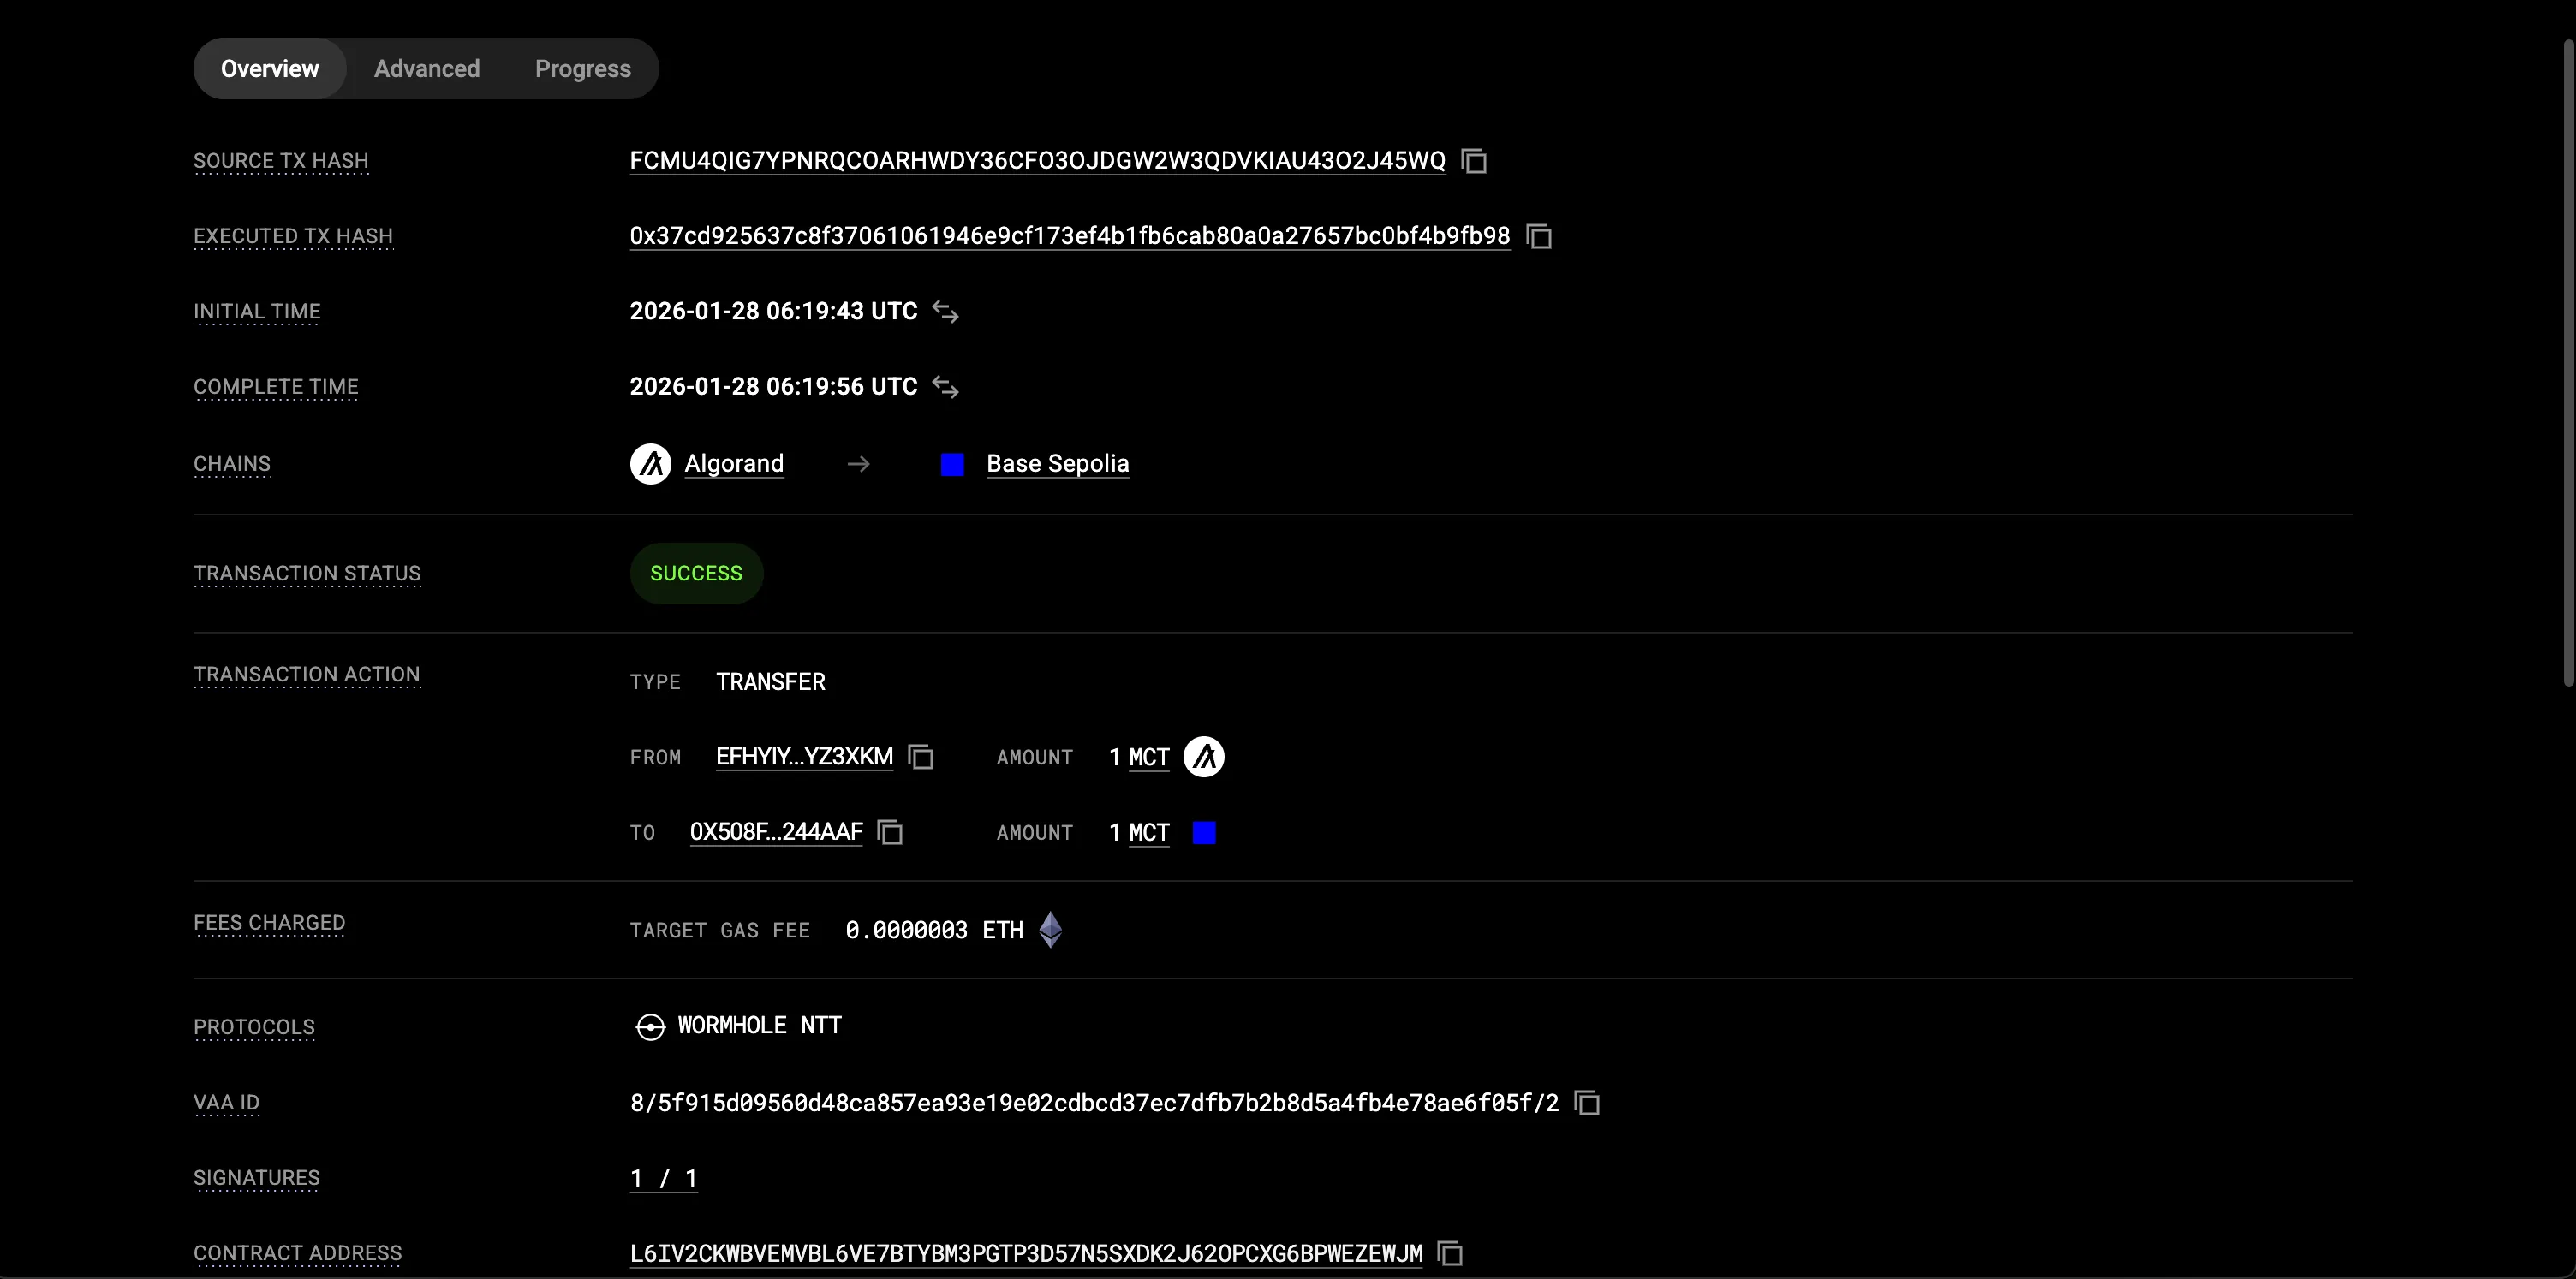
Figure: AVM to EVM transfer result
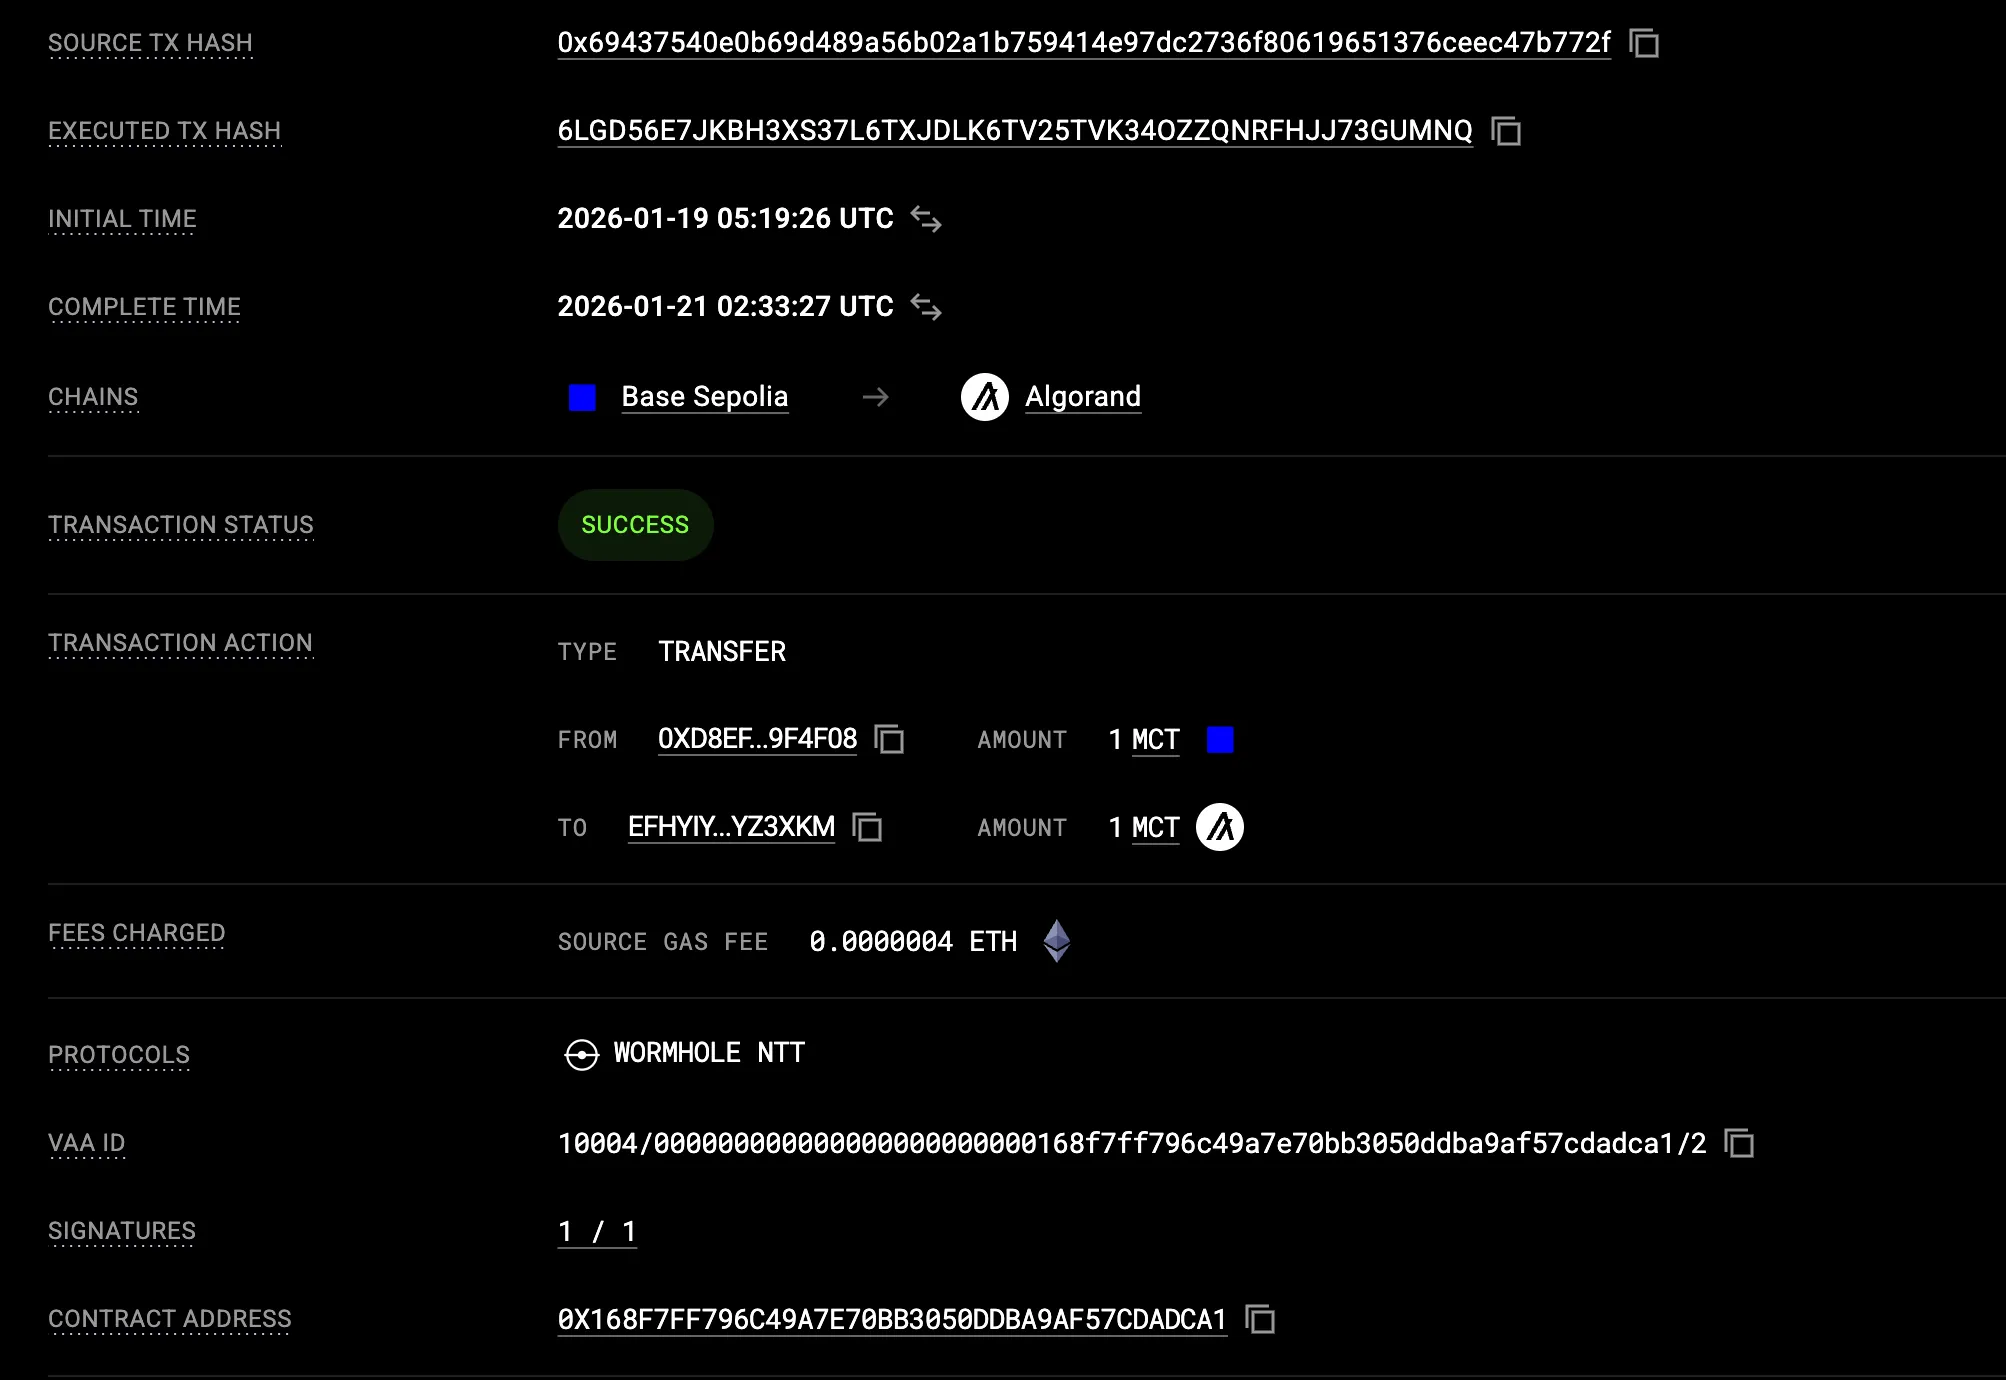
Figure: EVM to AVM transfer result
Troubleshooting Guide
Section titled “Troubleshooting Guide”Useful Commands Reference
Section titled “Useful Commands Reference”| Operation | Command |
|---|---|
| Mint Tokens | cast send $TOKEN "mint(address,uint256)" $RECIPIENT $AMOUNT --rpc-url $RPC --private-key $KEY |
| Check token balance | cast call $TOKEN "balanceOf(address)(uint256)" $ADDRESS --rpc-url $RPC |
| Approve spender | cast send $TOKEN "approve(address,uint256)" $SPENDER $AMOUNT --rpc-url $RPC --private-key $KEY |
| Check allowance | cast call $TOKEN "allowance(address,address)(uint256)" $OWNER $SPENDER --rpc-url $RPC |
| Check decimals | cast call $TOKEN "decimals()(uint8)" --rpc-url $RPC |
| Check total supply | cast call $TOKEN "totalSupply()(uint256)" --rpc-url $RPC |
| Check ETH balance | cast balance $ADDRESS --rpc-url $RPC |
| Send ETH | cast send $RECIPIENT --value 0.1ether --rpc-url $RPC --private-key $KEY |
| Get nonce | cast nonce $ADDRESS --rpc-url $RPC |
| Get transaction receipt | cast receipt $TX_HASH --rpc-url $RPC |
| Get peer configuration | cast call $WORMHOLE_TRANSCEIVER "getWormholePeer(uint16)(bytes32)" $CHAIN_ID --rpc-url $RPC |
| Check if peer is set | cast call $NTT_MANAGER "getPeer(uint16)((bytes32,uint8,uint256))" $CHAIN_ID --rpc-url $RPC |
| Get rate limit info | cast call $NTT_MANAGER "getCurrentOutboundCapacity()(uint256)" --rpc-url $RPC \ cast call $NTT_MANAGER "getCurrentInboundCapacity(uint16)(uint256)" $CHAIN_ID --rpc-url $RPC |
| ETH balance | cast balance $YOUR_EVM_ADDRESS --rpc-url https://sepolia.base.org |
| Token balance | cast call $TOKEN_ADDRESS "balanceOf(address)(uint256)" $YOUR_EVM_ADDRESS --rpc-url https://sepolia.base.org |
| Token allowance for FolksBridge | cast call $TOKEN_ADDRESS "allowance(address,address)(uint256)" $YOUR_EVM_ADDRESS $BASE_SEPOLIA_NTT_EXECUTOR_ADDRESS --rpc-url https://sepolia.base.org |
| Check WormholeTransceiver peer on Base Sepolia | cast call $WORMHOLE_TRANSCEIVER_ADDRESS "getWormholePeer(uint16)(bytes32)" 8 --rpc-url https://sepolia.base.org |
Troubleshooting Decision Tree
Section titled “Troubleshooting Decision Tree”Transfer Failed?│├─> Insufficient funds error?| ├─> Check source chain| ├─> Algorand: Check ALGO balance(need 10 ALGO)| ├─> Get funds from [Lora](https://lora.algokit.io/testnet/fund)│ ├─> ETH: Check ETH balance (need 0.002+ ETH)│ └─> Get funds from Coinbase or any other faucet│├─> InsufficientAllowance (0xfb8f41b2)?│ ├─> Approve FolksBridge Contract│ └─> Approve NttManager Address│├─> InsufficientBalance (0xe450d38c)?│ ├─> Check token balance│ ├─> Mint/Transfer more tokens if needed│ └─> Use ETH/ALGO for fees instead of FOLKS│├─> Invalid private key?│ ├─> Ensure 0x prefix│ └─> Verify 64 hex characters│├─> Decimal mismatch?│ ├─> Check both chains have same decimals│ └─> Override decimals() in PeerToken.sol│├─> Peer not configured?│ ├─> Verify setPeer on both chains│ ├─> Check 32-byte padding for EVM addresses│ └─> Run configure.ts on Algorand│├─> VAA not delivered?| ├─> Transaction successful on EVM chain?| └─> Check WormholeScan for VAA Status|├─> Transfer Got Stuck at Finalised?| |-> NTT Address has minter role?| └─> Grant minter role to NTTManagerConclusion
Section titled “Conclusion”You have successfully deployed a cross-chain NTT token bridge between Base Sepolia and Algorand Testnet. Once you are confident with the bidirectional transfers on testnet you can start preparing for mainnet deployment with updated configurations