This is the abridged developer documentation for Algorand Developer Portal
# Algorand Developer Portal
> Everything you need to build solutions powered by the Algorand blockchain network.
Start your journey today ## Become an Algorand Developer Follow our quick start guide to install Algorand’s developer toolkit and go from zero to deploying your "Hello, world" smart contract in mere minutes using TypeScript or Python pathways. Join the network ## Run an Algorand node Join the Algorand network with a validator node using accessible commodity hardware in a matter of minutes. Experience how easy it is to become a node-runner so you can participate in staking rewards, validate blocks, submit transactions, and read chain data.
# Intro to AlgoKit
AlgoKit is a comprehensive software development kit designed to streamline and accelerate the process of building decentralized applications on the Algorand blockchain. At its core, AlgoKit features a powerful command-line interface (CLI) tool that provides developers with an array of functionalities to simplify blockchain development. Along with the CLI, AlgoKit offers a suite of libraries, templates, and tools that facilitate rapid prototyping and deployment of secure, scalable, and efficient applications. Whether you’re a seasoned blockchain developer or new to the ecosystem, AlgoKit offers everything you need to harness the full potential of Algorand’s impressive tech and innovative consensus algorithm. [Introduction to AlgoKit](https://www.youtube.com/embed/pojEI-8h0lg?rel=0) ## AlgoKit CLI AlgoKit CLI is a powerful set of command line tools for Algorand developers. Its goal is to help developers build and launch secure, automated, production-ready applications rapidly. ### AlgoKit CLI commands Here is the list of commands that you can use with AlgoKit CLI. * \- Bootstrap AlgoKit project dependencies * \- Compile Algorand Python code * \- Install shell completions for AlgoKit * \- Deploy your smart contracts effortlessly to various networks * \- Fund your TestNet account with ALGOs from the AlgoKit TestNet Dispenser * \- Check AlgoKit installation and dependencies * \- Explore Algorand Blockchains using lora * \- Generate code for an Algorand project * \- Run the Algorand goal CLI against the AlgoKit Sandbox * \- Quickly initialize new projects using official Algorand Templates or community provided templates * \- Manage a locally sandboxed private Algorand network * \- Perform a variety of AlgoKit project workspace related operations like bootstrapping development environment, deploying smart contracts, running custom commands, and more * \- Perform a variety of useful operations like signing & sending transactions, minting ASAs, creating vanity address, and more, on the Algorand blockchain To learn more about AlgoKit CLI, refer to the following resources: Learn more about using and configuring AlgoKit CLI Explore the codebase and contribute to its development ## Algorand Python If you are a Python developer, you no longer need to learn a complex smart contract language to write smart contracts. Algorand Python is a semantically and syntactically compatible, typed Python language that works with standard Python tooling and allows you to write Algorand smart contracts (apps) and logic signatures in Python. Since the code runs on the Algorand virtual machine(AVM), there are limitations and minor differences in behaviors from standard Python, but all code you write with Algorand Python is Python code. Here is an example of a simple Hello World smart contract written in Algorand Python: ```py from algopy import ARC4Contract, String, arc4 class HelloWorld(ARC4Contract): @arc4.abimethod() def hello(self, name: String) -> String: return "Hello, " + name + "!" ``` To learn more about Algorand Python, refer to the following resources: Learn more about the design and implementation of Algorand Python Explore the codebase and contribute to its development ## Algorand TypeScript If you are a TypeScript developer, you no longer need to learn a complex smart contract language to write smart contracts. Algorand TypeScript is a semantically and syntactically compatible, typed TypeScript language that works with standard TypeScript tooling and allows you to write Algorand smart contracts (apps) and logic signatures in TypeScript. Since the code runs on the Algorand virtual machine(AVM), there are limitations and minor differences in behaviors from standard TypeScript, but all code you write with Algorand TypeScript is TypeScript code. Here is an example of a simple Hello World smart contract written in Algorand TypeScript: ```ts import { Contract } from '@algorandfoundation/algorand-typescript'; export class HelloWorld extends Contract { hello(name: string): string { return `Hello, ${name}`; } } ``` To learn more about Algorand TypeScript, refer to the following resources: Learn more about the design and implementation of Algorand TypeScript Explore the codebase and contribute to its development ## AlgoKit Utils AlgoKit Utils is a utility library recommended for you to use for all chain interactions like sending transactions, creating tokens(ASAs), calling smart contracts, and reading blockchain records. The goal of this library is to provide intuitive, productive utility functions that make it easier, quicker, and safer to build applications on Algorand. Largely, these functions wrap the underlying Algorand SDK but provide a higher-level interface with sensible defaults and capabilities for common tasks. AlgoKit Utils is available in TypeScript and Python. ### Capabilities The library helps you interact with and develop against the Algorand blockchain with a series of end-to-end capabilities as described below: * \- The key entrypoint to the AlgoKit Utils functionality * Core capabilities * \- Creation of (auto-retry) algod, indexer and kmd clients against various networks resolved from environment or specified configuration * \- Creation and use of accounts including mnemonic, rekeyed, multisig, transaction signer ( for dApps and Atomic Transaction Composer compatible signers), idempotent KMD accounts and environment variable injected * \- Reliable and terse specification of microAlgo and Algo amounts and conversion between them * \- Ability to send single, grouped or Atomic Transaction Composer transactions with consistent and highly configurable semantics, including configurable control of transaction notes (including ARC-0002), logging, fees, multiple sender account types, and sending behavior * Higher-order use cases * \- Creation, updating, deleting, calling (ABI and otherwise) smart contract apps and the metadata associated with them (including state and boxes) * \- Idempotent (safely retryable) deployment of an app, including deploy-time immutability and permanence control and TEAL template substitution * \- Builds on top of the App management and App deployment capabilities to provide a high productivity application client that works with ARC-0032 application spec defined smart contracts (e.g. via Beaker) * \- Ability to easily initiate algo transfers between accounts, including dispenser management and idempotent account funding * \- Terse, robust automated testing primitives that work across any testing framework (including jest and vitest) to facilitate fixture management, quickly generating isolated and funded test accounts, transaction logging, indexer wait management and log capture * \- Type-safe indexer API wrappers (no more `Record` pain), including automatic pagination control To learn more about AlgoKit Utils, refer to the following resources: Learn more about the design and implementation of Algorand Utils Explore the codebase and contribute to its development Learn more about the design and implementation of Algorand Utils Explore the codebase and contribute to its development [Introduction to Algokit Utils](https://www.youtube.com/embed/AkUj1GgcMig?rel=0) ## AlgoKit LocalNet The AlgoKit LocalNet feature allows you to manage (start, stop, reset, manage) a locally sandboxed private Algorand network. This allows you to interact with and deploy changes against your own Algorand network without needing to worry about funding TestNet accounts, whether the information you submit is publicly visible, or whether you are connected to an active Internet connection (once the network has been started). AlgoKit LocalNet uses Docker images optimized for a great developer experience. This means the Docker images are small and start fast. It also means that features suited to developers are enabled, such as KMD (so you can programmatically get faucet private keys). To learn more about AlgoKit Localnet, refer to the following resources: Learn more about using and configuring AlgoKit Localnet Explore the source code and technical implementation details ## AVM Debugger The AlgoKit AVM VS Code debugger extension provides a convenient way to debug any Algorand Smart Contracts written in TEAL. To learn more about the AVM debugger, refer to the following resources: Learn more about using and configuring the AVM Debugger Explore the AVM Debugger codebase and contribute to its development ## Language Servers The Algorand VS Code Language Extensions provide developers with enhanced capabilities to build Algorand smart contracts efficiently within Visual Studio Code. Designed to work alongside the standard Python and TypeScript language servers, these extensions extend core IDE functionality by adding Algorand-specific diagnostics, validation, and intelligent code actions. The integrates seamlessly with the official Python extension and automatically detects the PuyaPy environment to offer real-time contract-aware analysis and quick fixes, helping developers catch errors early and improve code quality. Similarly, the supports Algorand’s specialized TypeScript and smart contract utilities, providing targeted diagnostics and validation in a familiar developer workflow. Both extensions simplify the development process by offering immediate feedback relevant to Algorand’s unique blockchain environment, accelerating learning and reducing common mistakes. Currently in beta, they require Visual Studio Code 1.80.0 or later and are designed to complement existing language tooling, making them essential tools for any developer working on Algorand smart contracts. Learn more about the TypeScript Language Server Learn more about the Python Language Server ## Client Generator The client generator generates a type-safe smart contract client for the Algorand Blockchain that wraps the application client in AlgoKit Utils and tailors it to a specific smart contract. It does this by reading an ARC-0032 application spec file and generating a client that exposes methods for each ABI method in the target smart contract, along with helpers to create, update, and delete the application. To learn more about the client generator, refer to the following resources: Learn more about the TypeScript client generator for Algorand smart contracts Explore the TypeScript client generator codebase and contribute to its development Learn more about the Python client generator for Algorand smart contracts Explore the Python client generator codebase and contribute to its development ## Testnet Dispenser The AlgoKit TestNet Dispenser API provides functionalities to interact with the Dispenser service. This service enables users to fund and refund assets. To learn more about the testnet dispenser, refer to the following resources: Learn more about using and configuring the AlgoKit TestNet Dispenser Explore the technical implementation and contribute to its development ## AlgoKit Tools and Versions While AlgoKit as a *collection* was bumped to Version 3.0 on March 26, 2025, it is important to note that the individual tools in the kit are on different package version numbers. In the future this may be changed to epoch versioning so that it is clear that all packages are part of the same epoch release. | Tool | Repository | AlgoKit 3.0 Min Version | | ------------------------------------------ | ------------------------------- | ----------------------- | | Command Line Interface (CLI) | algokit-cli | 2.6.0 | | Utils (Python) | algokit-utils-py | 4.0.0 | | Utils (TypeScript) | algokit-utils-ts | 9.0.0 | | Client Generator (Python) | algokit-client-generator-py | 2.1.0 | | Client Generator (TypeScript) | algokit-client-generator-ts | 5.0.0 | | Subscriber (Python) | algokit-subscriber-py | 1.0.0 | | Subscriber (TypeScript) | algokit-subscriber-ts | 3.2.0 | | Puya Compiler | puya | 4.5.3 | | Puya Compiler, TypeScript | puya-ts | 1.0.0-beta.58 | | AVM Unit Testing (Python) | algorand-python-testing | 0.5.0 | | AVM Unit Testing (TypeScript) | algorand-typescript-testing | 1.0.0-beta.30 | | Lora the Explorer | algokit-lora | 1.2.0 | | AVM VSCode Debugger | algokit-avm-vscode-debugger | 1.1.5 | | Utils Add-On for TypeScript Debugging | algokit-utils-ts-debug | 1.0.4 | | Base Project Template | algokit-base-template | 1.1.0 | | Python Smart Contract Project Template | algokit-python-template | 1.6.0 | | TypeScript Smart Contract Project Template | algokit-typescript-template | 0.3.1 | | React Vite Frontend Project Template | algokit-react-frontend-template | 1.1.1 | | Fullstack Project Template | algokit-fullstack-template | 2.1.4 | ## Install ### Prerequisites The installation pre-requisites change depending on the method you use to install. Please refer to . Depending on the features you choose to leverage from the AlgoKit CLI, additional dependencies may be required. The AlgoKit CLI will tell you if you are missing one for a given command. These optional dependencies are: * **Git**: Essential for creating and updating projects from templates. Installation guide available at . * **Docker**: Necessary for running the AlgoKit LocalNet environment. Docker Compose version 2.5.0 or higher is required. See . * **Python**: For those installing the AlgoKit CLI via `pipx` or building contracts using Algorand Python. **Minimum required version is Python 3.12+ when working with Algorand Python**. See . * **Node.js**: For those working on frontend templates or building contracts using Algorand TypeScript or TEALScript. **Minimum required versions are Node.js `v22` and npm `v10`**. See . ### Cross-platform installation AlgoKit can be installed using OS specific package managers, or using the python tool . See below for specific installation instructions. #### Installation Methods ### Install AlgoKit on Windows 1. Ensure prerequisites are installed * (should be installed by default on recent Windows 10 or later) * (or `winget install git.git`) * (or `winget install docker.dockerdesktop`) 2. Install using winget ```shell winget install algokit ``` 3. #### Maintenance Some useful commands for updating or removing AlgoKit in the future. * To update AlgoKit: `winget upgrade algokit` * To remove AlgoKit: `winget uninstall algokit` ### Install AlgoKit on Mac 1. Ensure prerequisites are installed * (should already be available if `brew` is installed) * , (or `brew install --cask docker`) 1. Install using Homebrew ```shell brew install algorandfoundation/tap/algokit ``` 2. Restart the terminal to ensure AlgoKit is available on the path 3. #### Maintenance Some useful commands for updating or removing AlgoKit in the future. * To update AlgoKit: `brew upgrade algokit` * To remove AlgoKit: `brew uninstall algokit` ### Install AlgoKit on Linux 1. Ensure prerequisites are installed * (should be installed by default on Ubuntu 16.04.4 LTS (Xenial Xerus) or later) 1. Install using snap ```shell sudo snap install algokit --classic ``` > For detailed guidelines per each supported linux distro, refer to . 2. #### Maintenance Some useful commands for updating or removing AlgoKit in the future. * To update AlgoKit: `snap refresh algokit` * To remove AlgoKit: `snap remove --purge algokit` ### Install AlgoKit with pipx on any OS 1. Ensure desired prerequisites are installed 1. Install using pipx ```shell pipx install algokit ``` 2. Restart the terminal to ensure AlgoKit is available on the path 3. #### Maintenance Some useful commands for updating or removing AlgoKit in the future. * To update AlgoKit: `pipx upgrade algokit` * To remove AlgoKit: `pipx uninstall algokit` ### Verify installation Verify AlgoKit is installed correctly by running `algokit --version` and you should see output similar to: ```plaintext algokit, version 1.0.1 ``` It is also recommended that you run `algokit doctor` to verify there are no issues in your local environment and to diagnose any problems if you do have difficulties running AlgoKit. The output of this command will look similar to: ```plaintext timestamp: 2023-03-27T01:23:45+00:00 AlgoKit: 1.0.1 AlgoKit Python: 3.11.1 (main, Dec 23 2022, 09:28:24) [Clang 14.0.0 (clang-1400.0.29.202)] (location: /Users/algokit/.local/pipx/venvs/algokit) OS: macOS-13.1-arm64-arm-64bit docker: 20.10.21 docker compose: 2.13.0 git: 2.37.1 python: 3.10.9 (location: /opt/homebrew/bin/python) python3: 3.10.9 (location: /opt/homebrew/bin/python3) pipx: 1.1.0 poetry: 1.3.2 node: 18.12.1 npm: 8.19.2 brew: 3.6.18 If you are experiencing a problem with AlgoKit, feel free to submit an issue via: https://github.com/algorandfoundation/algokit-cli/issues/new Please include this output, if you want to populate this message in your clipboard, run `algokit doctor -c` ``` Per the above output, the doctor command output is a helpful tool if you need to ask for support or . ### Troubleshooting This section addresses specific edge cases and issues that some users might encounter when interacting with the CLI. The following table provides solutions to known edge cases: | Issue Description | OS(s) with observed behaviour | Steps to mitigate | References | | --------------------------------------------------------------------------------------------------------------------------------------------------- | --------------------------------------------------------- | ------------------------------------------------------------------------------------------------------------------------------------------------------------------------------------------------------------ | ---------- | | This scenario may arise if installed `python` was build without `--with-ssl` flag enabled, causing pip to fail when trying to install dependencies. | Debian 12 | Run `sudo apt-get install -y libssl-dev` to install the required openssl dependency. Afterwards, ensure to reinstall python with `--with-ssl` flag enabled. This includes options like or using tools like . | | | `poetry install` invoked directly or via `algokit project bootstrap all` fails on `Could NOT find PkgConfig (missing: PKG_CONFIG_EXECUTABLE)`. | `MacOS` >=14 using `python` 3.13 installed via `homebrew` | Install dependencies deprecated in `3.13` and latest MacOS versions via `brew install pkg-config`, delete the virtual environment folder and retry the `poetry install` command invocation. | N/A |
# AVM Debugger
> Tutorial on how to debug a smart contract using AVM Debugger
The AVM VSCode debugger enables inspection of blockchain logic through `Simulate Traces` - JSON files containing detailed transaction execution data without on-chain deployment. The extension requires both trace files and source maps that link original code (TEAL or Puya) to compiled instructions. While the extension works independently, projects created with algokit templates include utilities that automatically generate these debugging artifacts. For full list of available capabilities of debugger extension refer to this . This tutorial demonstrates the workflow using a Python-based Algorand project. We will walk through identifying and fixing a bug in an Algorand smart contract using the Algorand Virtual Machine (AVM) Debugger. We’ll start with a simple, smart contract containing a deliberate bug, and by using the AVM Debugger, we’ll pinpoint and fix the issue. This guide will walk you through setting up, debugging, and fixing a smart contract using this extension. [Debugging with AlgoKit 3.0](https://www.youtube.com/embed/yPWRlmmTSHA?rel=0) ## Prerequisites * Visual Studio Code (version 1.80.0 or higher) * Node.js (version 18.x or higher) * installed * extension installed * Basic understanding of ## Step 1: Setup the Debugging Environment Install the Algokit AVM VSCode Debugger extension from the VSCode Marketplace by going to extensions in VSCode, then search for Algokit AVM Debugger and click install. You should see the output like the following: 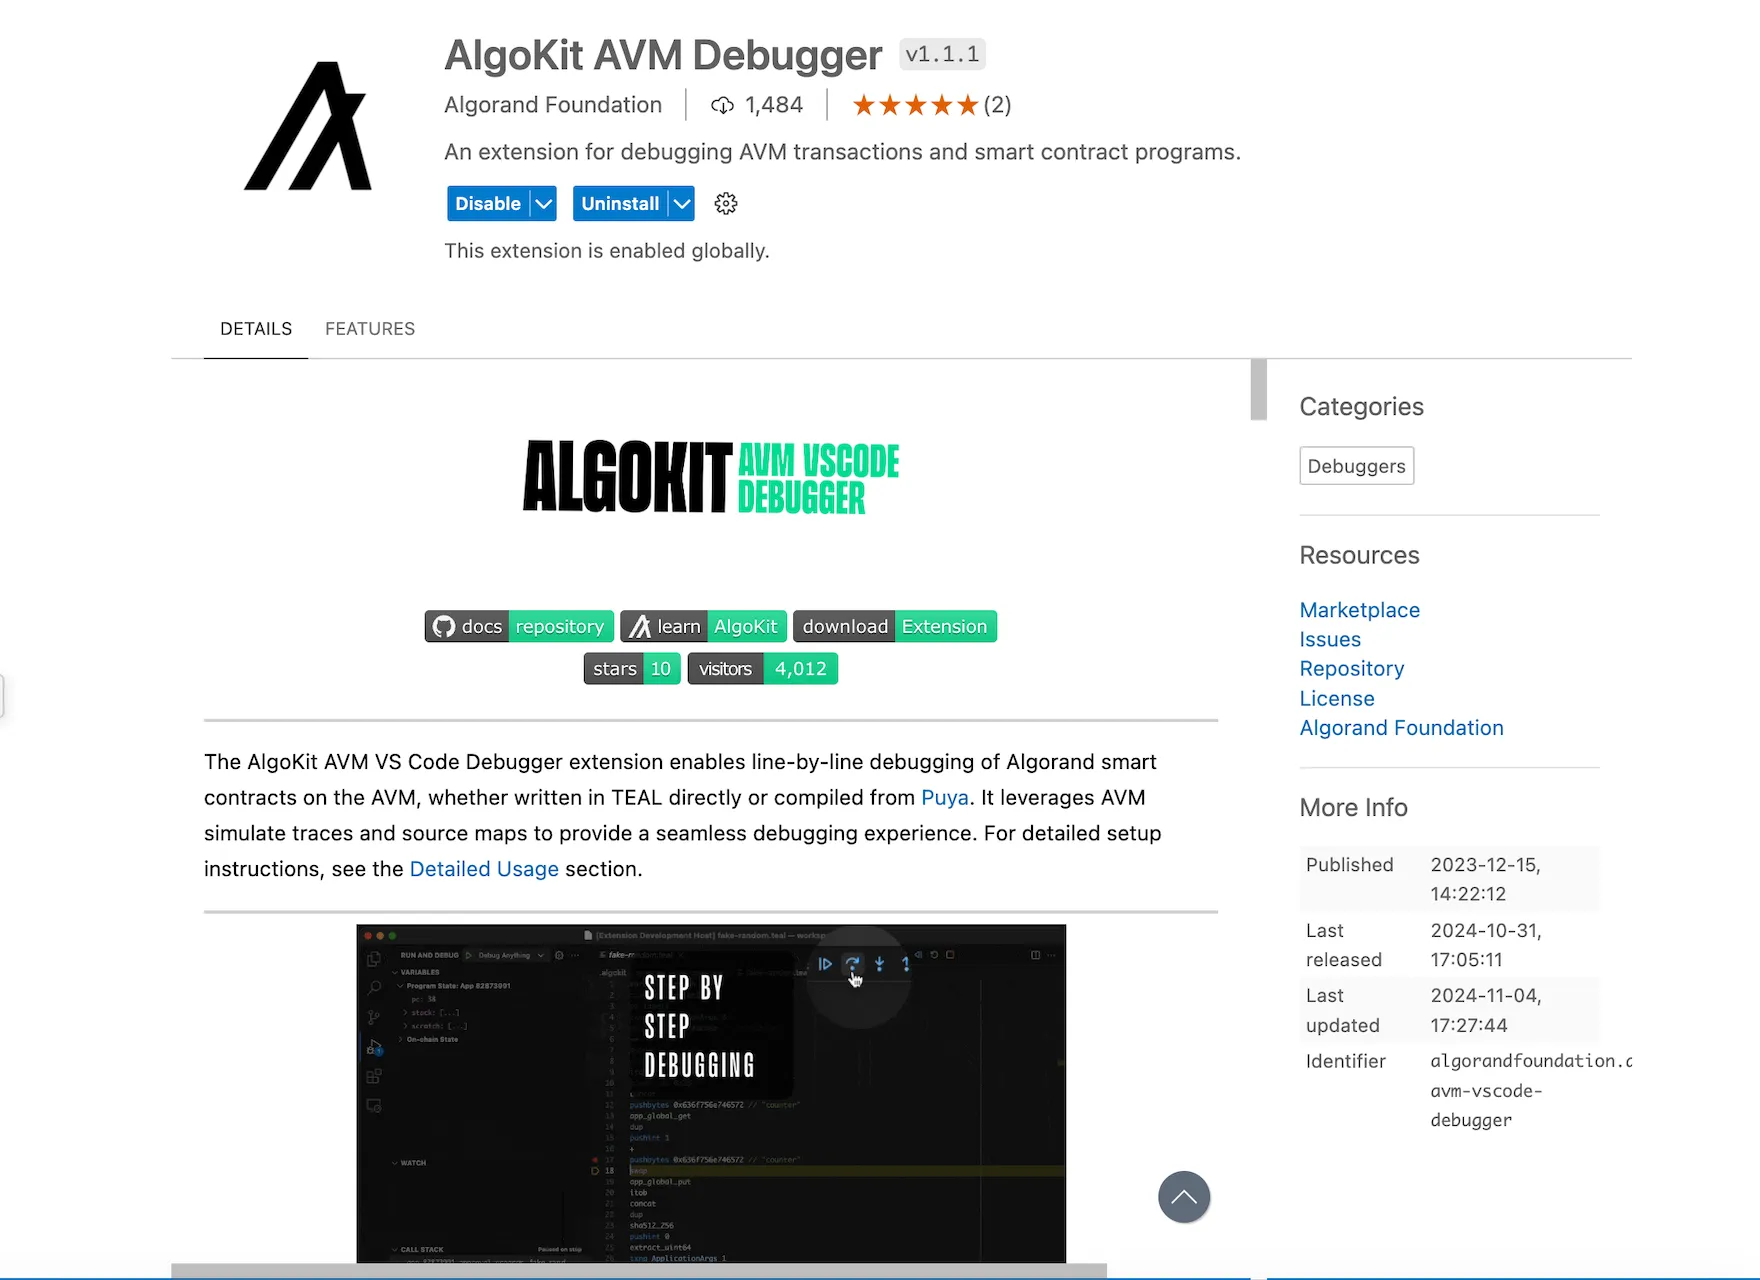 ## Step 2: Set Up the Example Smart Contract We aim to debug smart contract code in a project generated via `algokit init`. Refer to set up . Here’s the Algorand Python code for an `tictactoe` smart contract. The bug is in the `move` method, where `games_played` is updated by `2` for guest and `1` for host (which should be updated by 1 for both guest and host). Remove `hello_world` folder Create a new tic tac toe smart contract starter via `algokit generate smart-contract -a contract_name "TicTacToe"` Replace the content of `contract.py` with the code below. Add the below deployment code in `deploy.config` file: ## Step 3: Compile & Deploy the Smart Contract To enable debugging mode and full tracing for each step in the execution, go to `main.py` file and add: ```python from algokit_utils.config import config config.configure(debug=True, trace_all=True) ``` For more details, refer to : Next compile the smart contract using AlgoKit: ```bash algokit project run build ``` This will generate the following files in artifacts: `approval.teal`, `clear.teal`, `clear.puya.map`, `approval.puya.map` and `arc32.json` files. The `.puya.map` files are result of the execution of puyapy compiler (which project run build command orchestrated and invokes automatically). The compiler has an option called `--output-source-maps` which is enabled by default. Deploy the smart contract on localnet: ```bash algokit project deploy localnet ``` This will automatically generate `*.appln.trace.avm.json` files in `debug_traces` folder, `.teal` and `.teal.map` files in sources. The `.teal.map` files are source maps for TEAL and those are automatically generated every time an app is deployed via `algokit-utils`. Even if the developer is only interested in debugging puya source maps, the teal source maps would also always be available as a backup in case there is a need to fall back to more lower level source map. ### Expected Behavior The expected behavior is that `games_played` should be updated by `1` for both guest and host ### Bug When `move` method is called, `games_played` will get updated incorrectly for guest player. ## Step 4: Start the debugger In the VSCode, go to run and debug on left side. This will load the compiled smart contract into the debugger. In the run and debug, select debug TEAL via Algokit AVM Debugger. It will ask to select the appropriate `debug_traces` file. 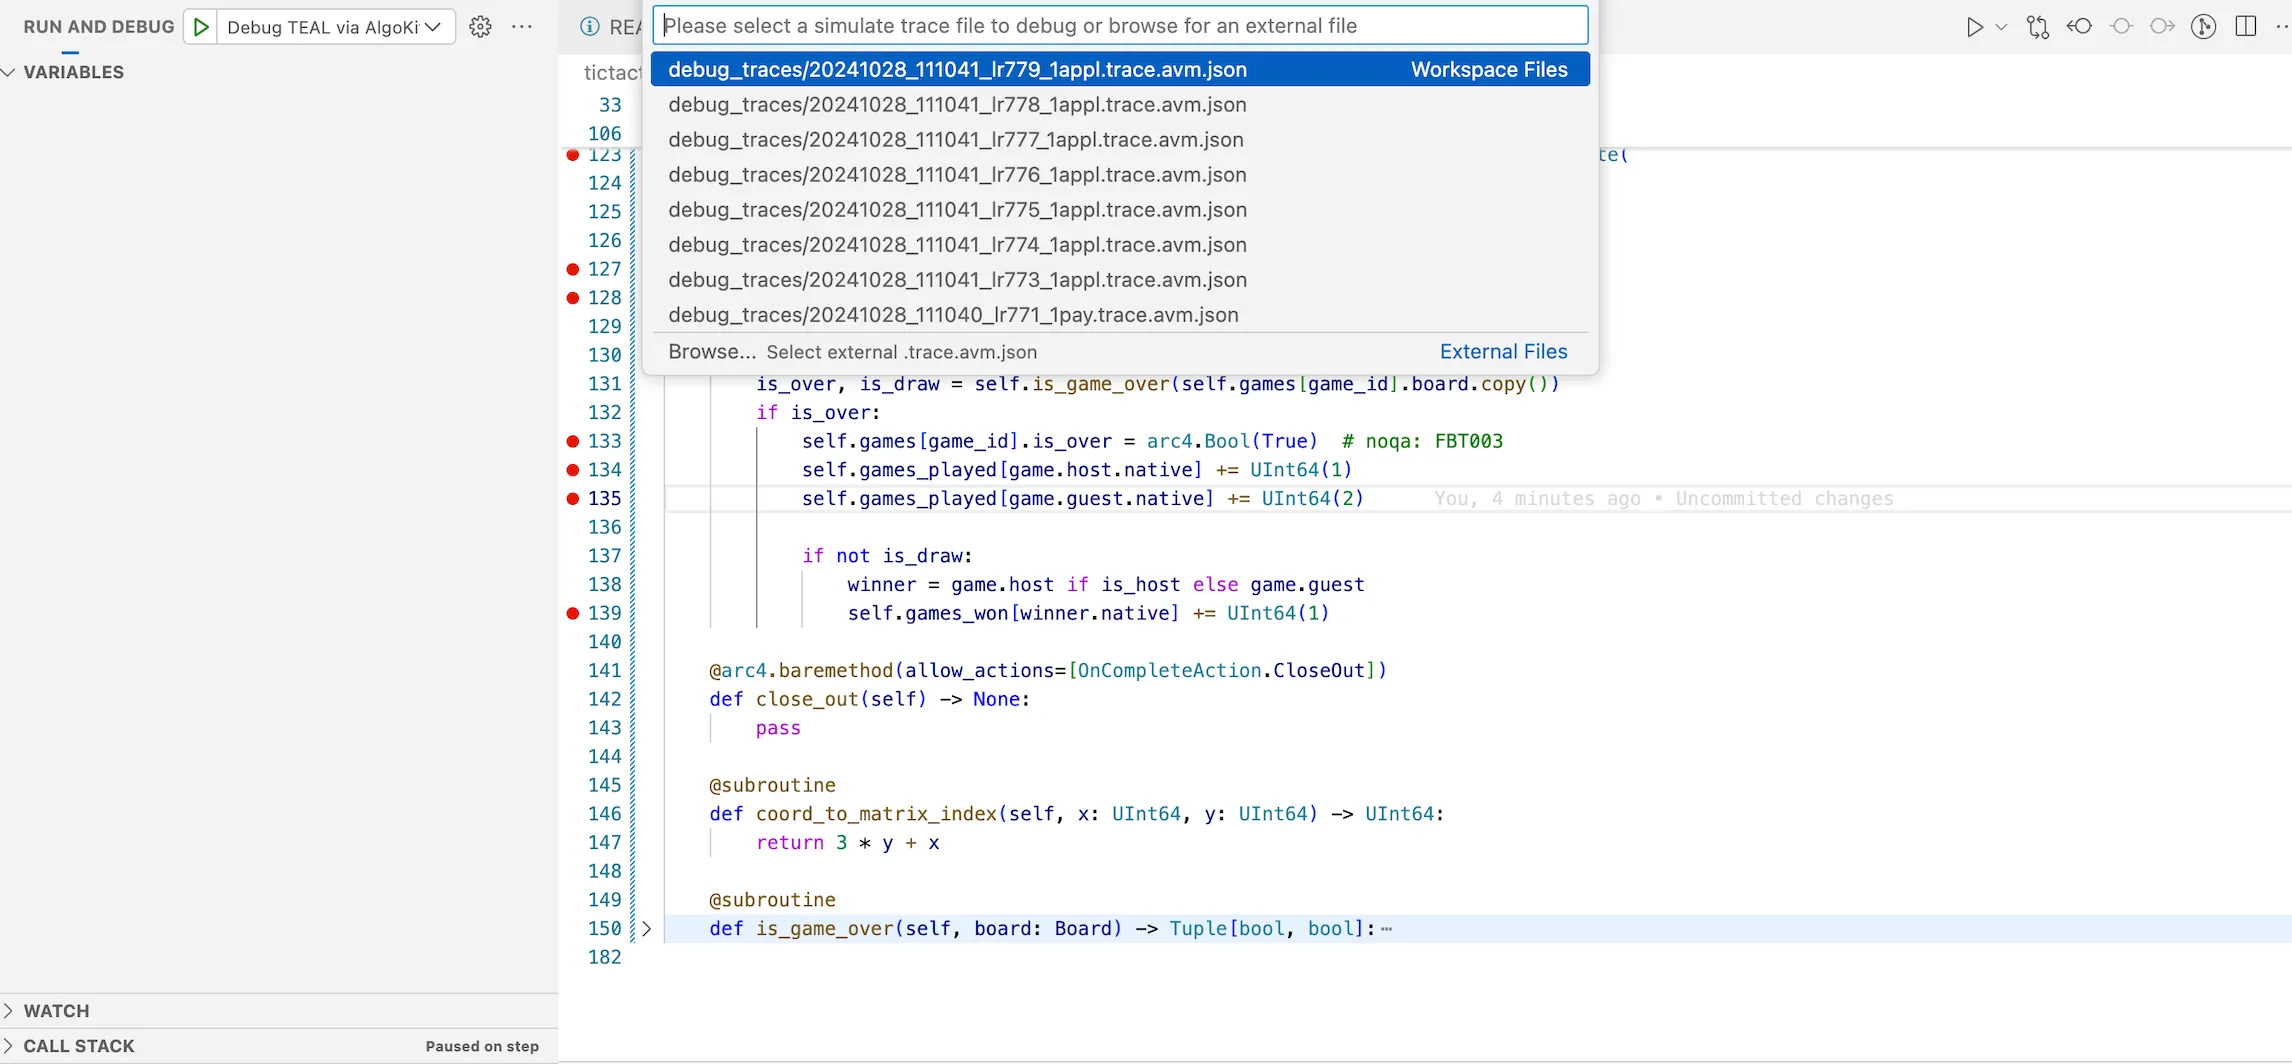 Figure: Load Debugger in VSCode Next it will ask you to select the source map file. Select the `approval.puya.map` file. Which would indicate to the debug extension that you would like to debug the given trace file using Puya sourcemaps, allowing you to step through high level python code. If you need to change the debugger to use TEAL or puya sourcemaps for other frontends such as Typescript, remove the individual record from `.algokit/sources/sources.avm.json` file or run the 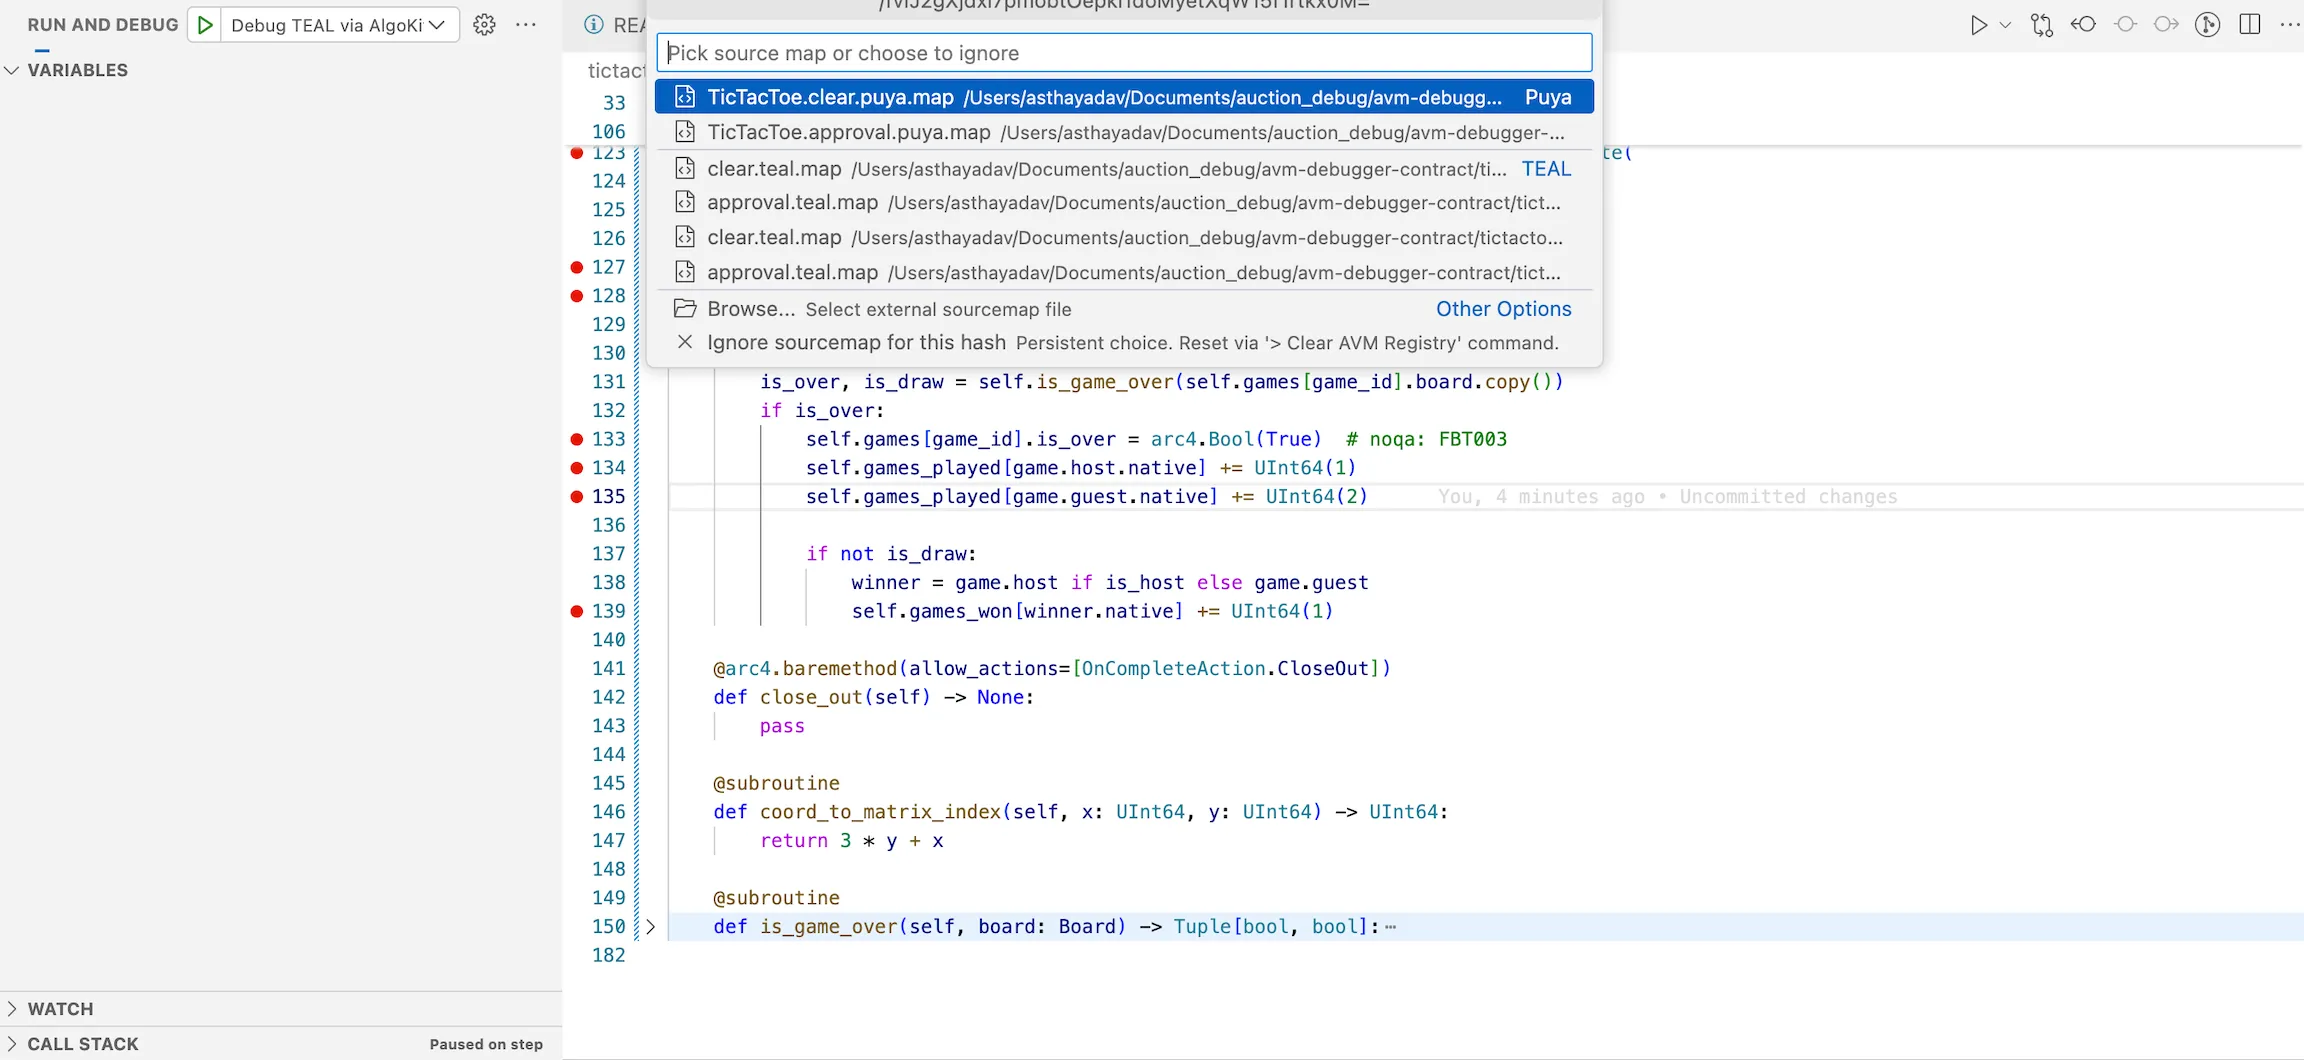 ## Step 5: Debugging the smart contract Let’s now debug the issue: 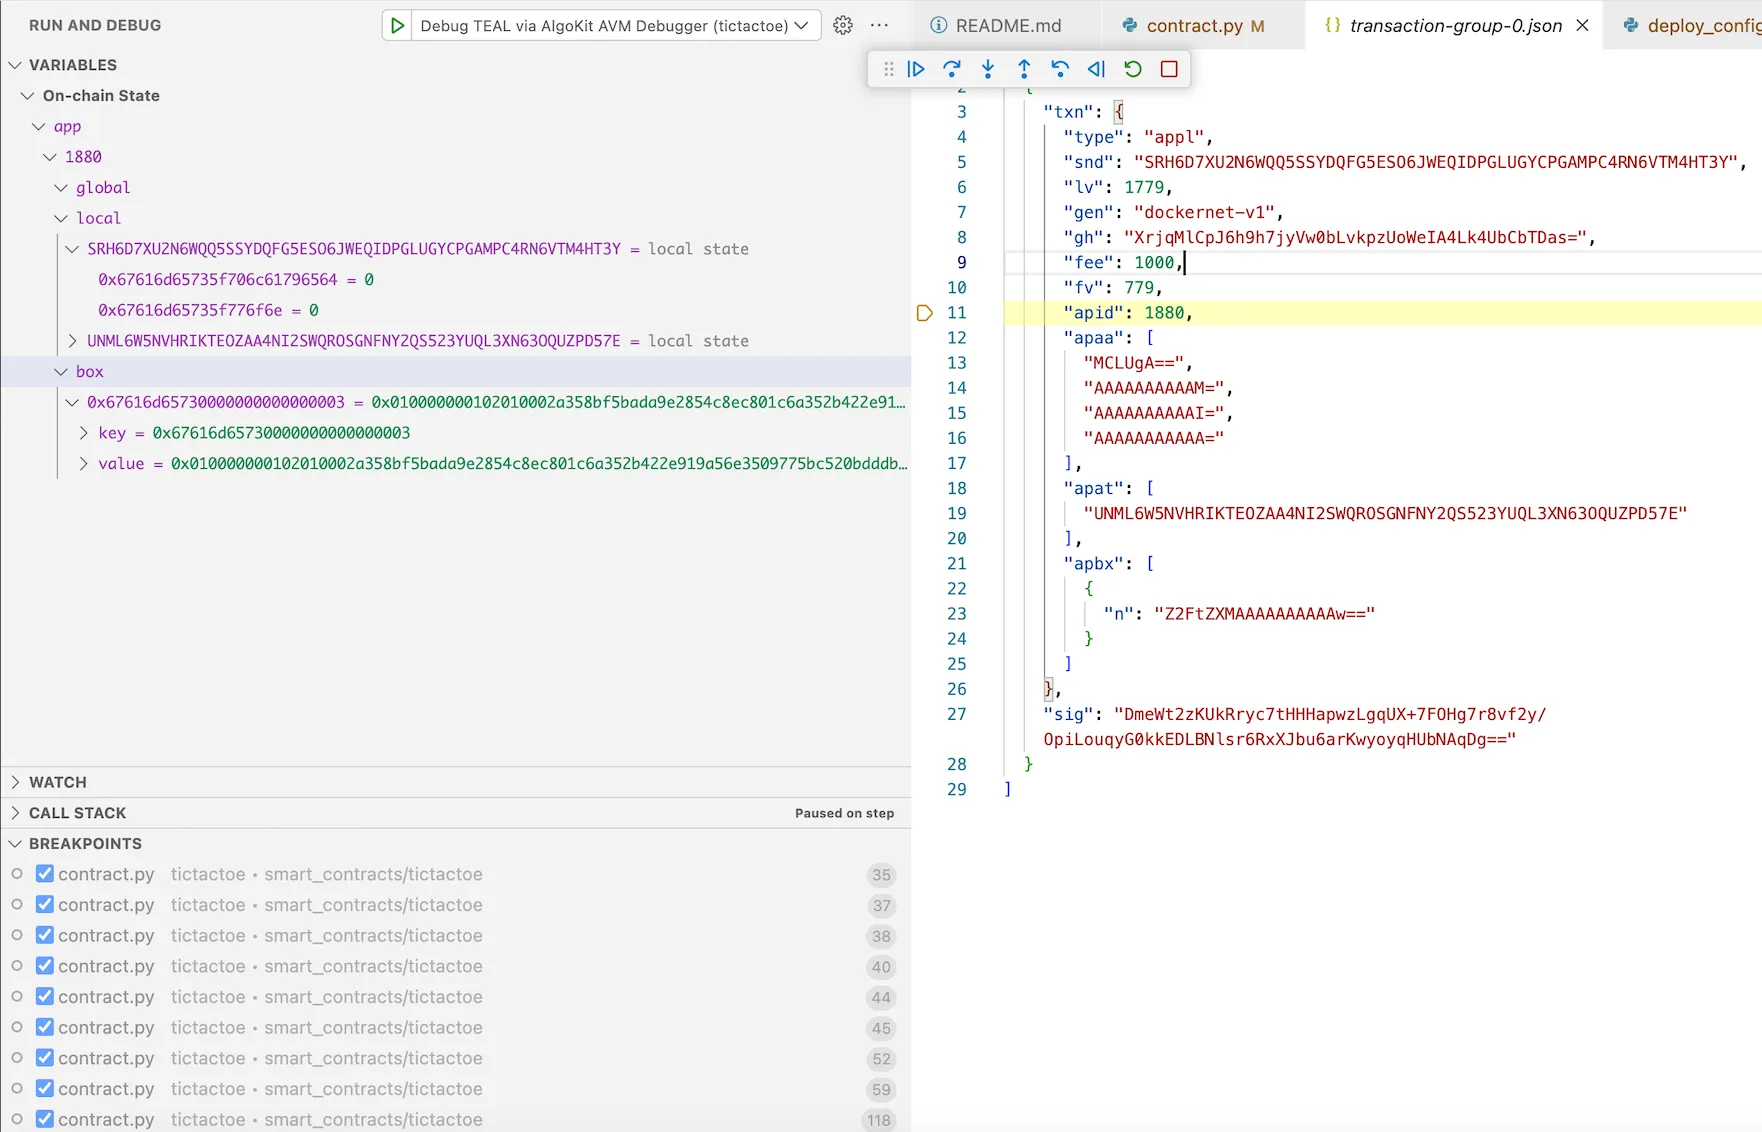 Enter into the `app_id` of the `transaction_group.json` file. This opens the contract. Set a breakpoint in the `move` method. You can also add additional breakpoints. 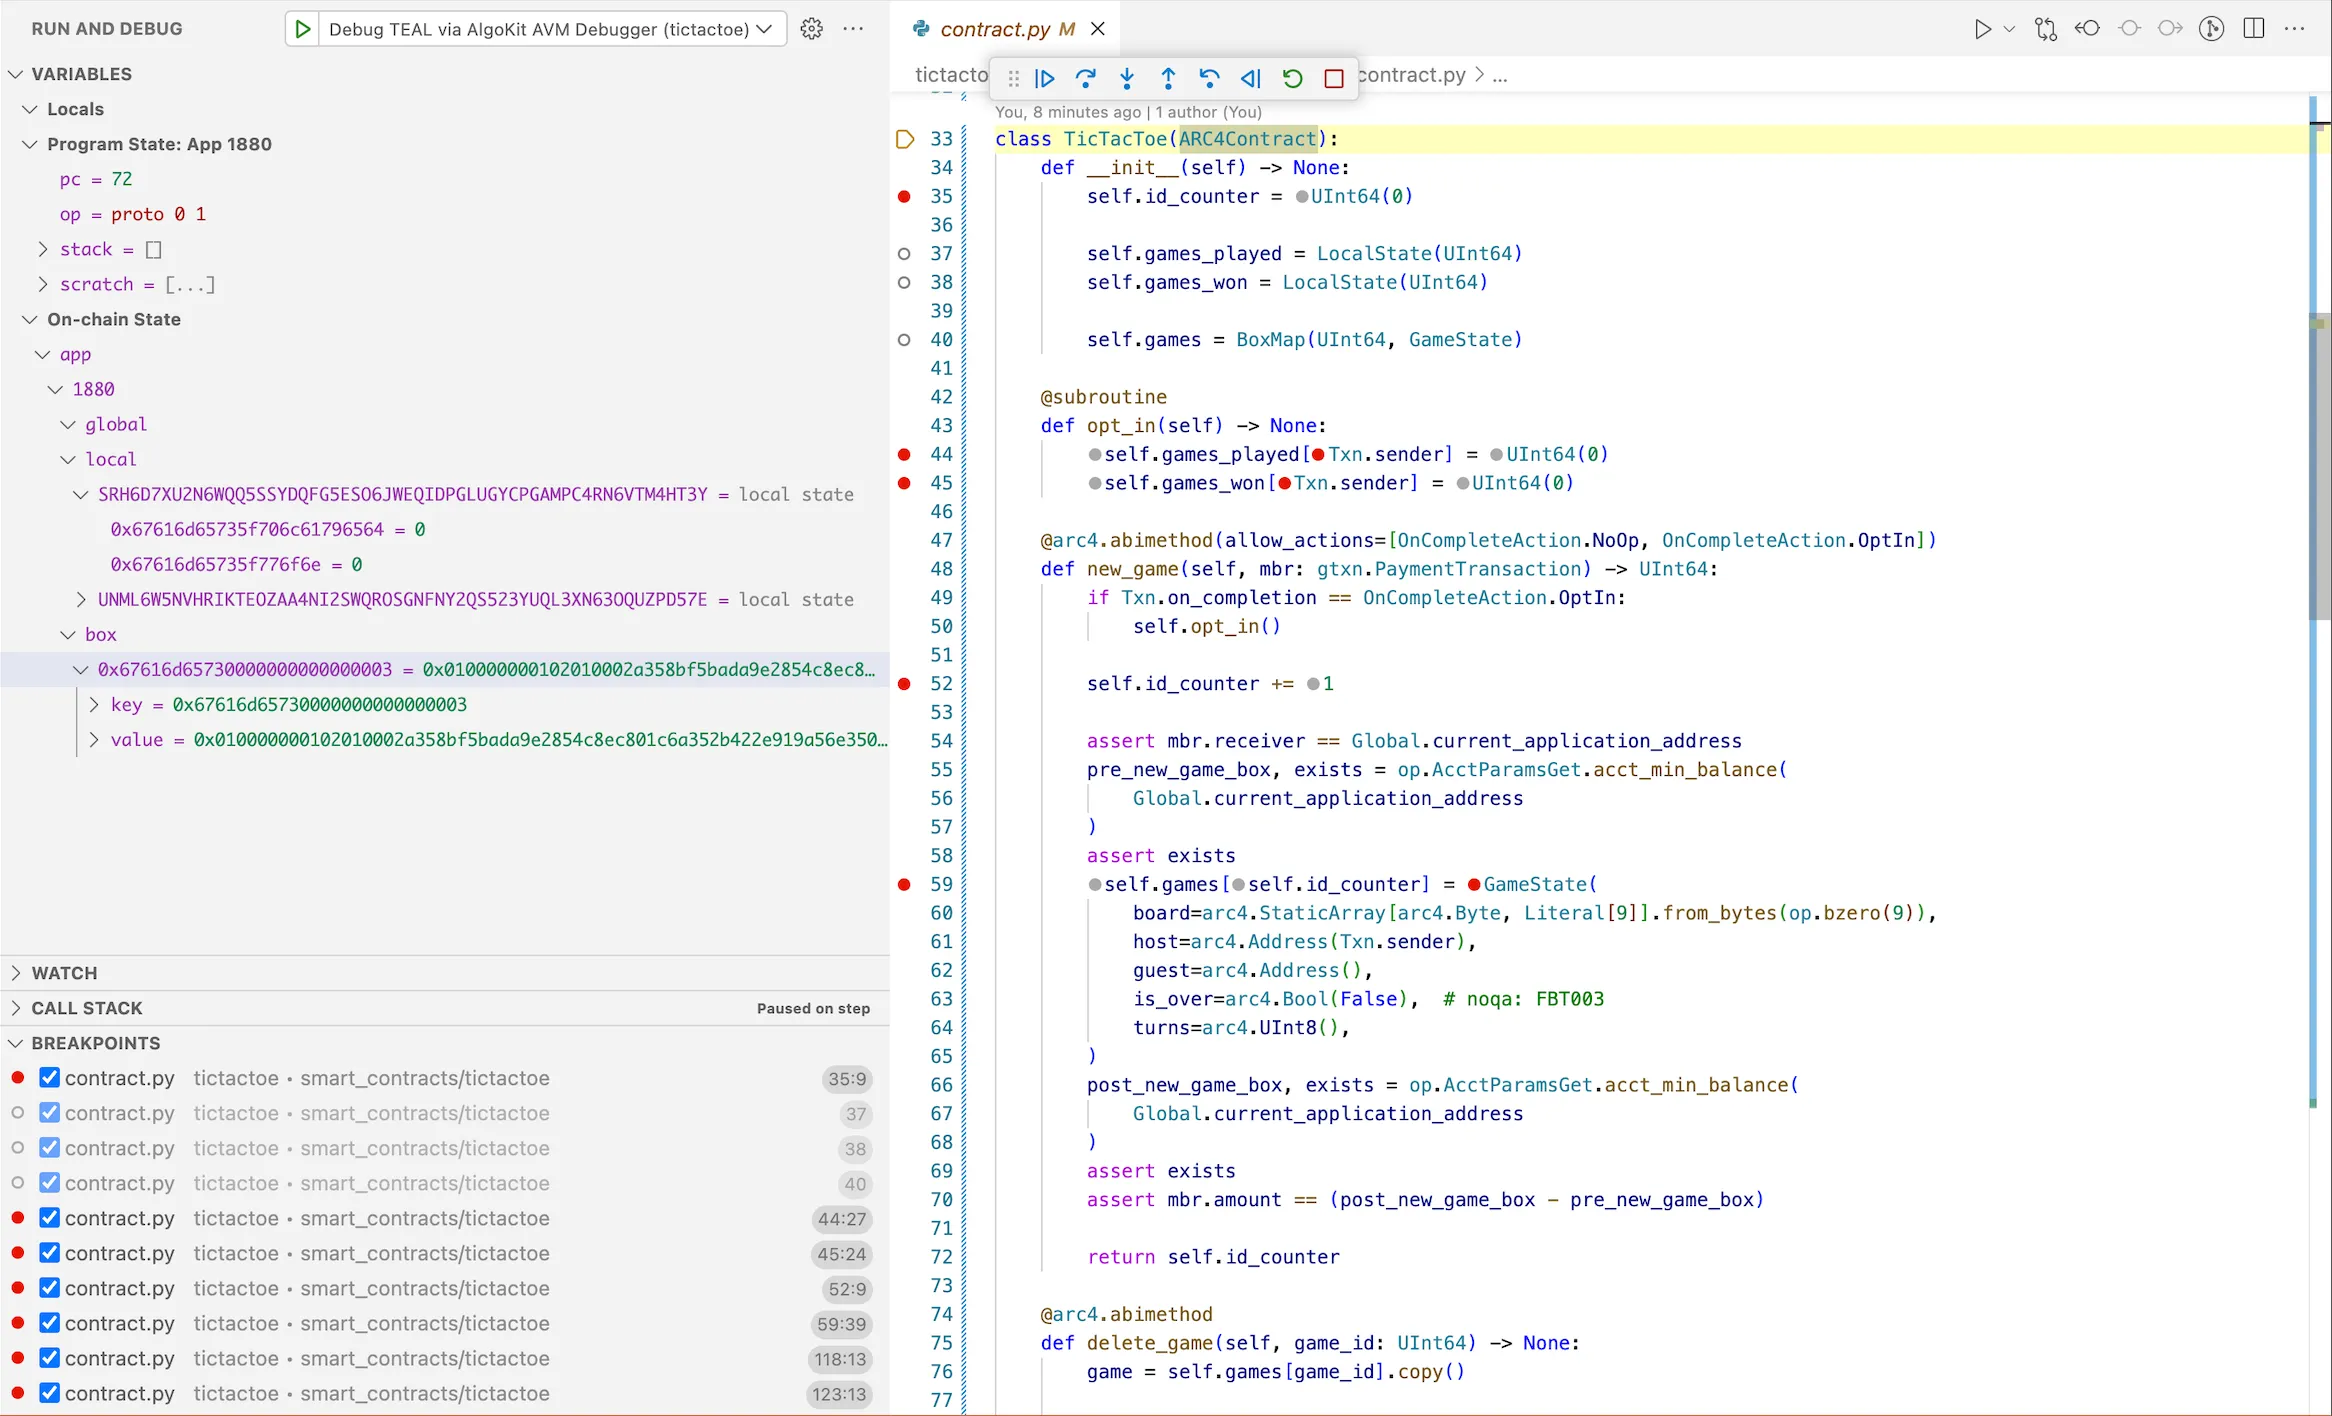 On left side, you can see `Program State` which includes `program counter`, `opcode`, `stack`, `scratch space`. In `On-chain State` you will be able to see `global`, `local` and `box` storages for the application id deployed on localnet. :::note: We have used localnet but the contracts can be deployed on any other network. A trace file is in a sense agnostic of the network in which the trace file was generated in. As long as its a complete simulate trace that contains state, stack and scratch states in the execution trace - debugger will work just fine with those as well. ::: Once you start step operations of debugging, it will get populated according to the contract. Now you can step-into the code. ## Step 6: Analyze the Output Observe the `games_played` variable for guest is increased by 2 (incorrectly) whereas for host is increased correctly. 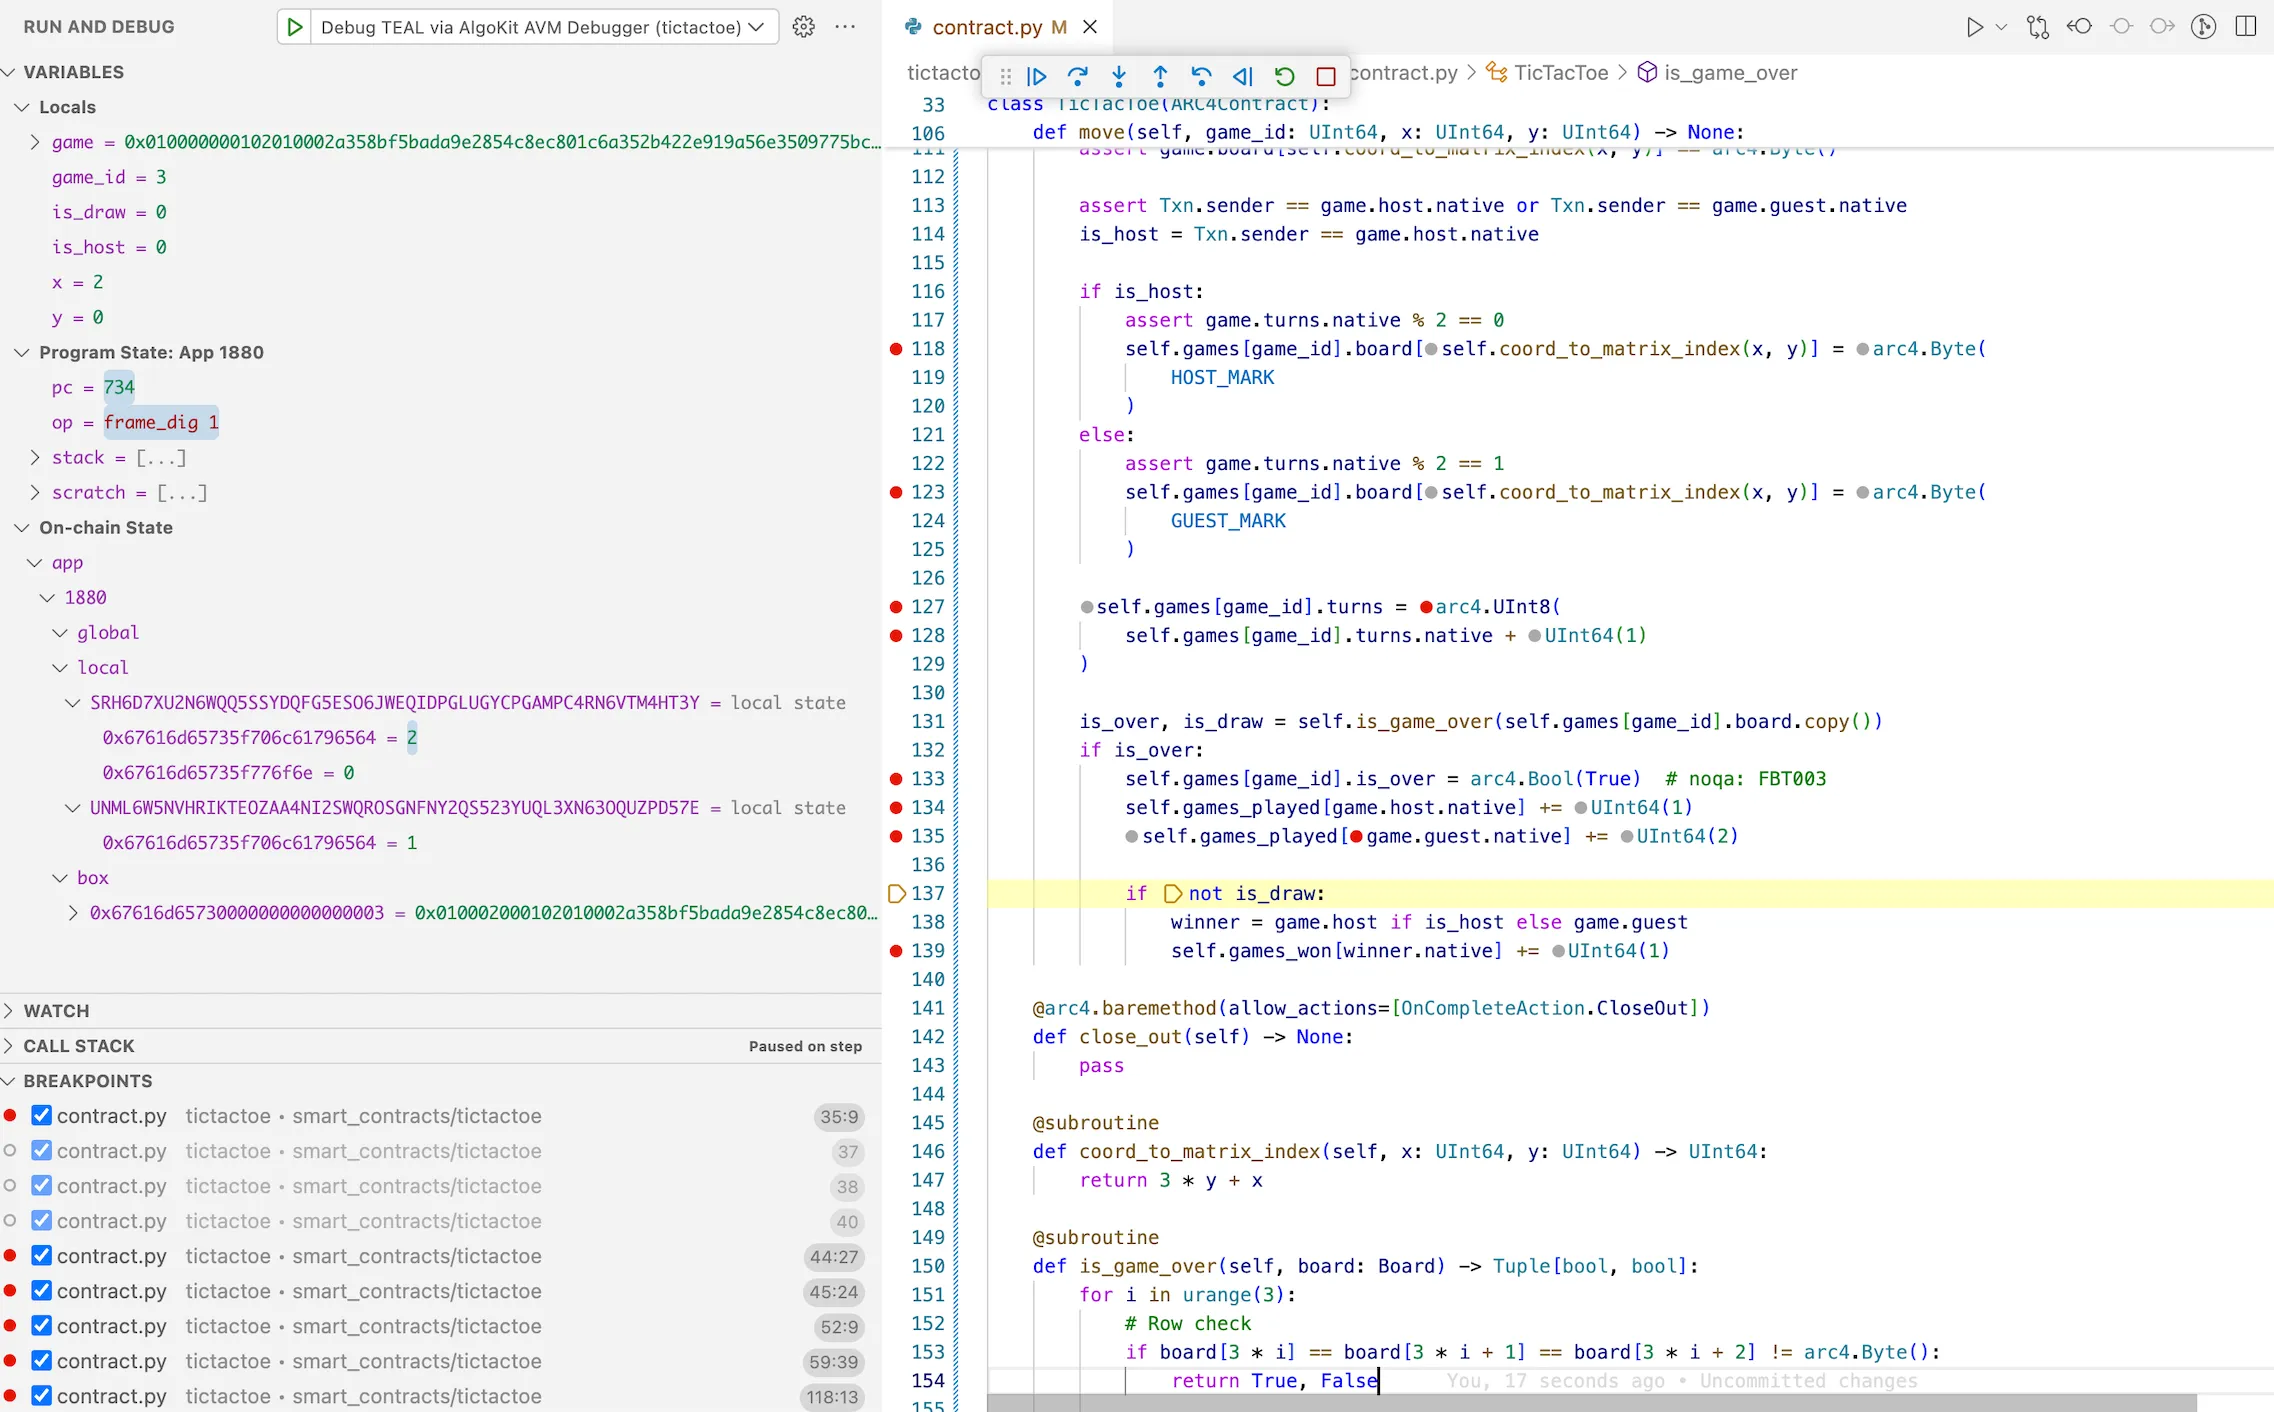 ## Step 7: Fix the Bug Now that we’ve identified the bug, let’s fix it in our original smart contract in `move` method: ## Step 8: Re-deploy Re-compile and re-deploy the contract using the `step 3`. ## Step 9: Verify again using Debugger Reset the `sources.avm.json` file, then restart the debugger selecting `approval.puya.source.map` file. Run through `steps 4 to 6` to verify that the `games_played` now updates as expected, confirming the bug has been fixed as seen below. 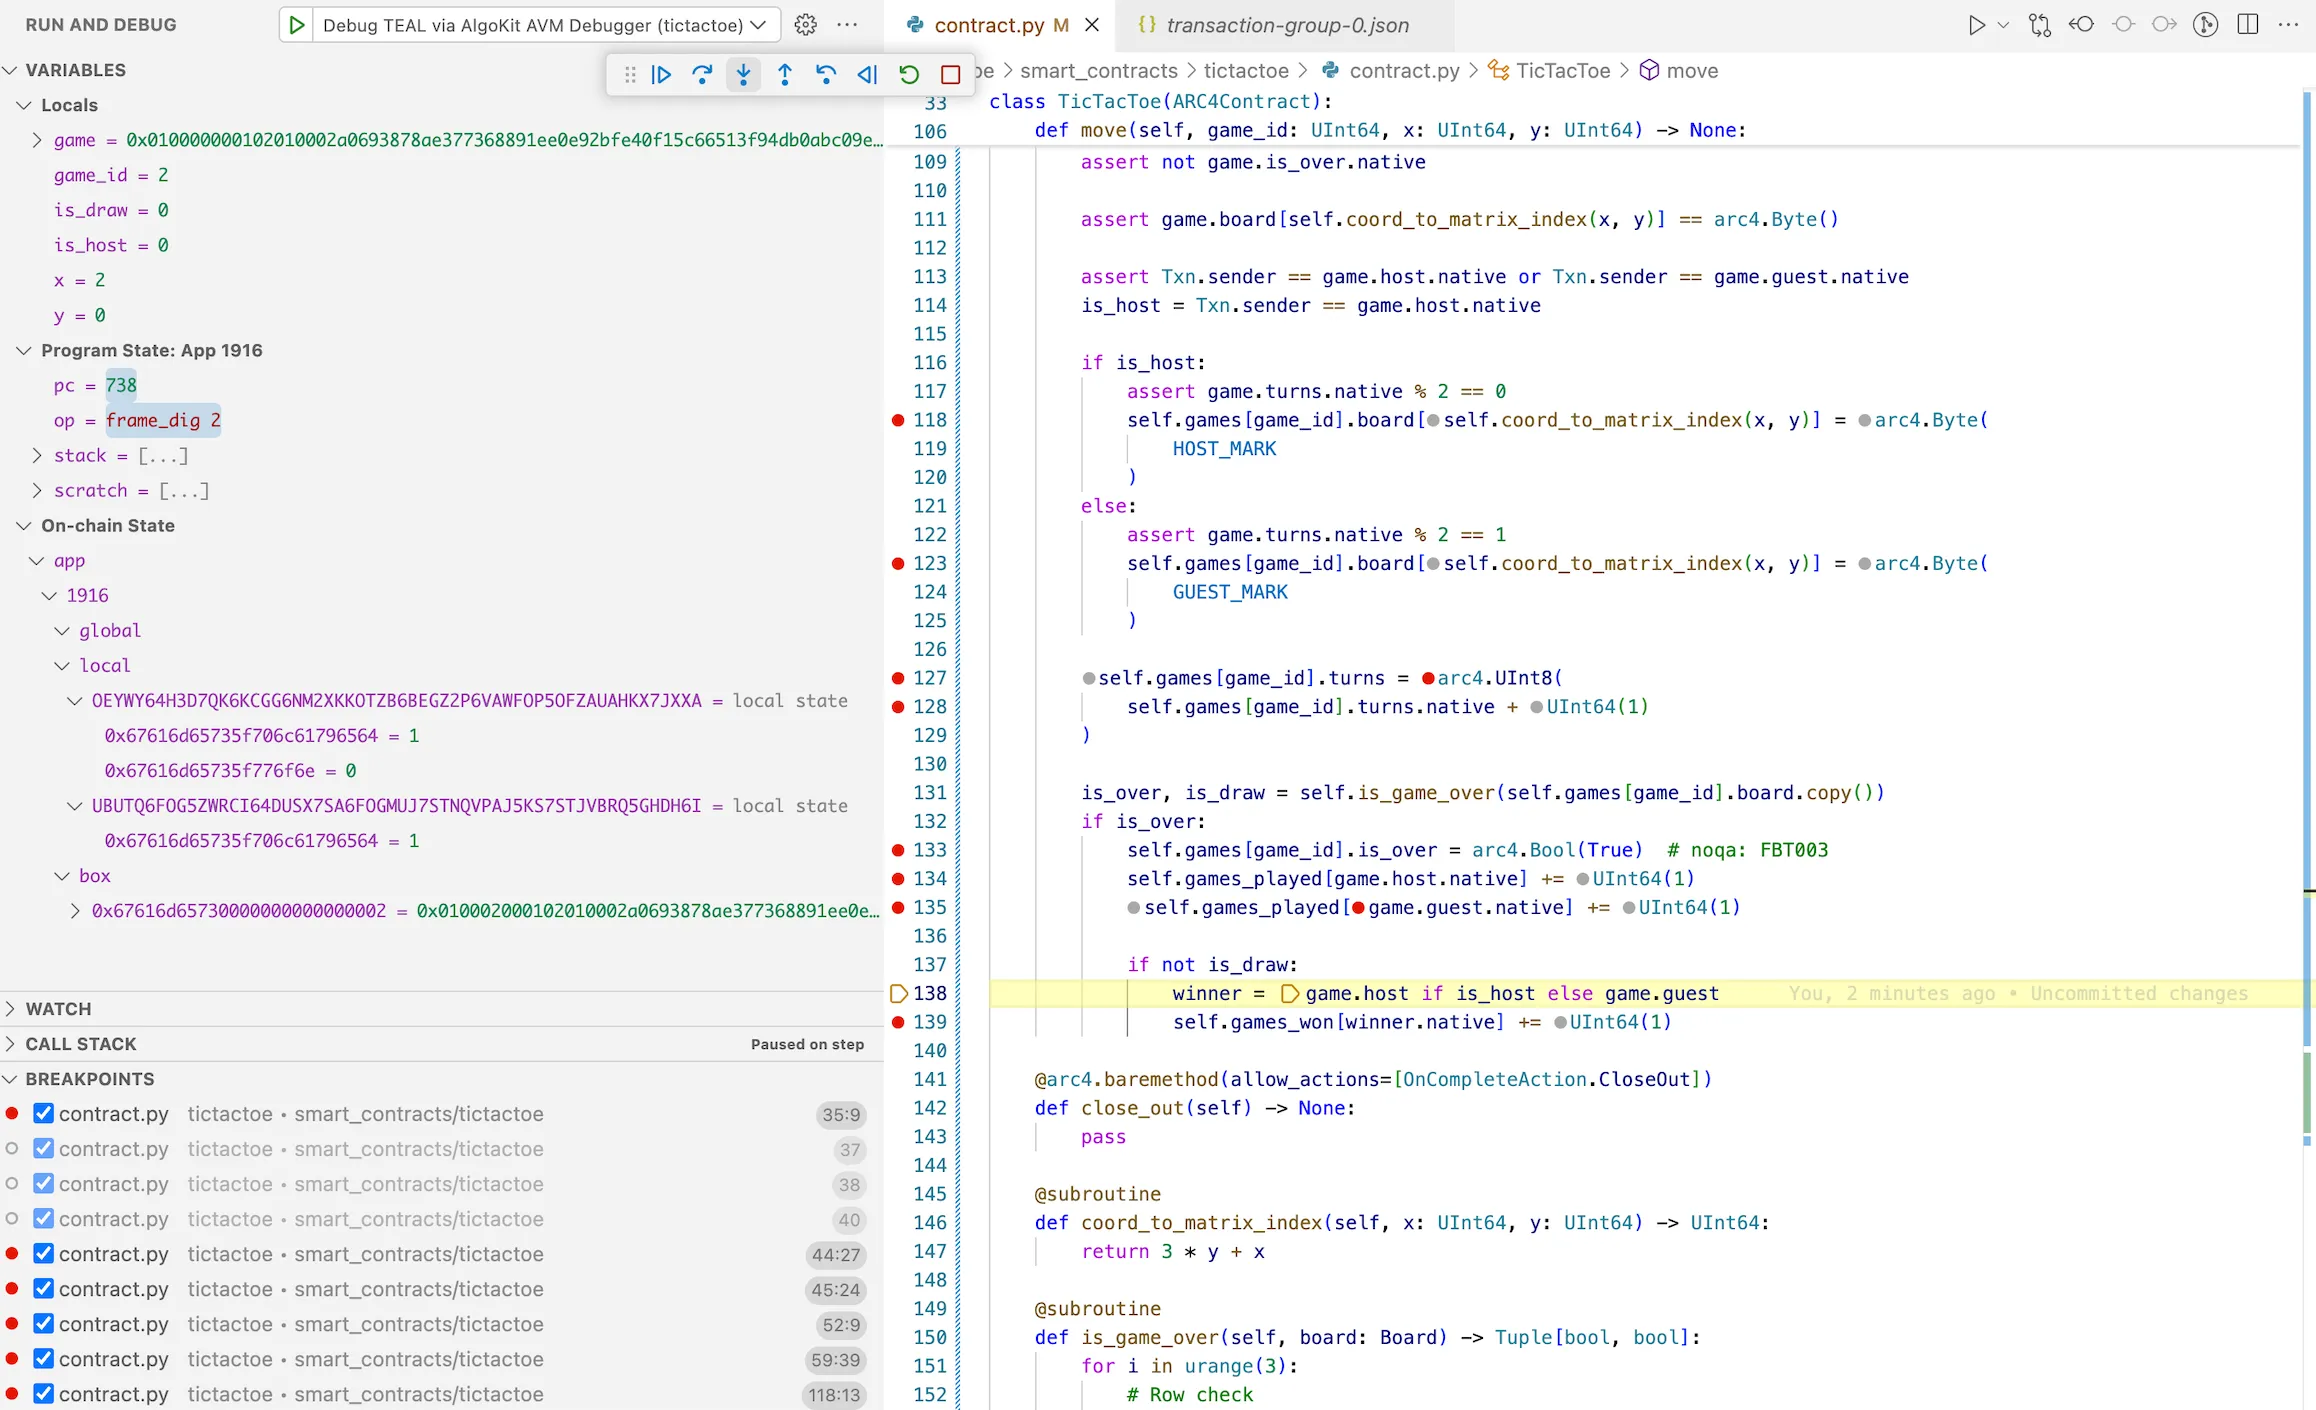 ## Summary In this tutorial, we walked through the process of using the AVM debugger from AlgoKit Python utils to debug an Algorand Smart Contract. We set up a debugging environment, loaded a smart contract with a planted bug, stepped through the execution, and identified the issue. This process can be invaluable when developing and testing smart contracts on the Algorand blockchain. It’s highly recommended to thoroughly test your smart contracts to ensure they function as expected and prevent costly errors in production before deploying them to the main network. ## Next steps To learn more, refer to documentation of the to learn more about Debugging session.
# AlgoKit Compile
The AlgoKit Compile feature enables you to compile smart contracts (apps) and smart signatures (logic signatures) written in a supported high-level language to a format deployable on the Algorand Virtual Machine (AVM). When running the compile command, AlgoKit will take care of working out which compiler you need and dynamically resolve it. Additionally, AlgoKit will detect if a matching compiler version is already installed globally on your machine or is included in your project and use that. ## Prerequisites See and for details. ## What is Algorand Python & PuyaPy? Algorand Python is a semantically and syntactically compatible, typed Python language that works with standard Python tooling and allows you to express smart contracts (apps) and smart signatures (logic signatures) for deployment on the Algorand Virtual Machine (AVM). Algorand Python can be deployed to Algorand by using the PuyaPy optimising compiler, which takes Algorand Python and outputs application spec files (among other formats) which, , will result in AVM bytecode execution semantics that match the given Python code. If you want to learn more, check out the . Below is an example Algorand Python smart contract. ```py from algopy import ARC4Contract, arc4 class HelloWorldContract(ARC4Contract): @arc4.abimethod def hello(self, name: arc4.String) -> arc4.String: return "Hello, " + name ``` For more complex examples, see the in the . ## What is Algorand TypeScript & PuyaTs? Algorand TypeScript is a typed TypeScript language that allows you to express smart contracts (apps) and smart signatures (logic signatures) for deployment on the Algorand Virtual Machine (AVM). Algorand TypeScript is currently in beta. Algorand TypeScript can be deployed to Algorand by using the PuyaTs optimising compiler, which takes Algorand TypeScript and outputs application spec files (among other formats) which, , will result in AVM bytecode execution semantics that match the given TypeScript code. Below is an example Algorand TypeScript smart contract. ```typescript import { Contract } from "@algorandfoundation/puya-sdk"; class HelloWorldContract extends Contract { hello(name: string): string { return "Hello, " + name; } } ``` ## Usage Available commands and possible usage are as follows: ```plaintext Usage: algokit compile [OPTIONS] COMMAND [ARGS]... Compile smart contracts and smart signatures written in a supported high-level language to a format deployable on the Algorand Virtual Machine (AVM). Options: -v, --version TEXT The compiler version to pin to, for example, 1.0.0. If no version is specified, AlgoKit checks if the compiler is installed and runs the installed version. If the compiler is not installed, AlgoKit runs the latest version. If a version is specified, AlgoKit checks if an installed version matches and runs the installed version. Otherwise, AlgoKit runs the specified version. -h, --help Show this message and exit. Commands: py Compile Algorand Python contract(s) using the PuyaPy compiler. python Compile Algorand Python contract(s) using the PuyaPy compiler. ts Compile Algorand TypeScript contract(s) using the PuyaTs compiler. typescript Compile Algorand TypeScript contract(s) using the PuyaTs compiler. ``` ### Compile Python The command `algokit compile python` or `algokit compile py` will run the compiler against the supplied Algorand Python smart contract. All arguments supplied to the command are passed directly to PuyaPy, therefore this command supports all options supported by the PuyaPy compiler. Any errors detected by PuyaPy during the compilation process will be printed to the output. #### Prerequisites PuyaPy requires Python 3.12+, so please ensure your Python version satisfies this requirement. This command will attempt to resolve a matching installed PuyaPy compiler, either globally installed in the system or locally installed in your project (via ). If no appropriate match is found, the PuyaPy compiler will be dynamically run using . In this case pipx is also required. #### Examples To see a list of the supported PuyaPy options, run the following: ```shell algokit compile python -h ``` To determine the version of the PuyaPy compiler in use, execute the following command: ```shell algokit compile python --version ``` To compile a single Algorand Python smart contract and write the output to a specific location, run the following: ```shell algokit compile python hello_world/contract.py --out-dir hello_world/out ``` To compile multiple Algorand Python smart contracts and write the output to a specific location, run the following: ```shell algokit compile python hello_world/contract.py calculator/contract.py --out-dir my_contracts ``` To compile a directory of Algorand Python smart contracts and write the output to the default location, run the following: ```shell algokit compile python my_contracts ``` ### Compile TypeScript The command `algokit compile typescript` or `algokit compile ts` will run the PuyaTs compiler against the supplied Algorand TypeScript smart contract. All arguments supplied to the command are passed directly to PuyaTs, therefore this command supports all options supported by the PuyaTs compiler. Any errors detected by PuyaTs during the compilation process will be printed to the output. #### Prerequisites PuyaTs requires Node 22+ and NPM 10+, so please ensure your versions satisfy this requirement. The command will attempt to find a correctly installed PuyaTs compiler in the following order: 1. First, it checks if a matching version is installed at the project level (using `npm ls`). 2. Next, it checks if a matching version is installed globally (using `npm --global ls`). 3. If no appropriate match is found, it will run the compiler using npx with the `-y` flag. #### Examples To see a list of the supported PuyaTs options, run the following: ```shell algokit compile typescript -h ``` To determine the version of the PuyaTs compiler in use, execute the following command: ```shell algokit compile typescript --version ``` To compile a single Algorand TypeScript smart contract and write the output to a specific location, run the following: ```shell algokit compile typescript hello_world/contract.algo.ts --out-dir hello_world/out ``` To build multiple Algorand TypeScript smart contracts and write the output to a specific location, run the following: ```shell algokit compile typescript hello_world/contract.algo.ts calculator/contract.algo.ts --out-dir my_contracts ``` To compile a directory of Algorand TypeScript smart contracts and write the output to the default location, run the following: ```shell algokit compile typescript my_contracts ```
# AlgoKit Completions
AlgoKit supports shell completions for zsh and bash shells, e.g. **bash** ```plaintext $ algokit bootstrap completions config doctor explore goal init sandbox ``` **zsh** ```plaintext $ ~ algokit bootstrap -- Bootstrap AlgoKit project dependencies. completions -- Install and Uninstall AlgoKit shell integration. config -- Configure AlgoKit options. doctor -- Run the Algorand doctor CLI. explore -- Explore the specified network in the... goal -- Run the Algorand goal CLI against the AlgoKit Sandbox. init -- Initializes a new project. sandbox -- Manage the AlgoKit sandbox. ``` ## Installing To setup the completions, AlgoKit provides commands that will modify the current users interactive shell script (`.bashrc`/`.zshrc`). > **Note** If you would prefer AlgoKit to not modify your interactive shell scripts you can install the completions yourself by following the instructions . To completions for the current shell execute `algokit completions install`. You should see output similar to below: ```plaintext $ ~ algokit completions install AlgoKit completions installed for zsh 🎉 Restart shell or run `. ~/.zshrc` to enable completions ``` After installing the completions don’t forget to restart the shell to begin using them! ## Uninstalling To completions for the current shell run `algokit completions uninstall`: ```plaintext $ ~ algokit completions uninstall AlgoKit completions uninstalled for zsh 🎉 ``` ## Shell Option To install/uninstall the completions for a specific the `--shell` option can be used e.g. `algokit completions install --shell bash`. To learn more about the `algokit completions` command, please refer to in the AlgoKit CLI reference documentation.
# AlgoKit Config
The `algokit config` command allows you to manage various global settings used by AlgoKit CLI. This feature is essential for customizing your AlgoKit environment to suit your needs. ## Usage This command group provides a set of subcommands to configure AlgoKit settings. Subcommands * `version-prompt`: Configure the version prompt settings. * `container-engine`: Configure the container engine settings. * `js-package-manager`: Configure the default JavaScript package manager. * `py-package-manager`: Configure the default Python package manager. ### Version Prompt Configuration ```zsh $ algokit config version-prompt [OPTIONS] ``` This command configures the version prompt settings for AlgoKit. * `--enable`: Enable the version prompt. * `--disable`: Disable the version prompt. ### Container Engine Configuration ```zsh $ algokit config container-engine [OPTIONS] [ENGINE] ``` This command configures the container engine settings for AlgoKit. * `--force`, `-f`: Skip confirmation prompts. Defaults to ‘yes’ to all prompts. * `ENGINE`: Optional argument to specify the container engine (docker or podman). ### JavaScript Package Manager Configuration ```zsh $ algokit config js-package-manager [OPTIONS] [PACKAGE_MANAGER] ``` This command configures the default JavaScript package manager used by AlgoKit’s bootstrap command. * `PACKAGE_MANAGER`: Optional argument to specify the package manager (npm or pnpm). If no package manager is specified, AlgoKit will prompt you to select one interactively. ### Python Package Manager Configuration ```zsh $ algokit config py-package-manager [OPTIONS] [PACKAGE_MANAGER] ``` This command configures the default Python package manager used by AlgoKit’s bootstrap command. * `PACKAGE_MANAGER`: Optional argument to specify the package manager (poetry or uv). If no package manager is specified, AlgoKit will prompt you to select one interactively. ## Further Reading For in-depth details, visit the in the AlgoKit CLI reference documentation.
# AlgoKit TestNet Dispenser
The AlgoKit Dispenser feature allows you to interact with the AlgoKit TestNet Dispenser. This feature is essential for funding your wallet with TestNet ALGOs, refunding ALGOs back to the dispenser wallet, and getting information about current fund limits on your account. ## Usage ```zsh $ algokit dispenser [OPTIONS] COMMAND [ARGS]... ``` This command provides a set of subcommands to interact with the AlgoKit TestNet Dispenser. Subcommands * `login`: Login to your Dispenser API account. * `logout`: Logout of your Dispenser API account. * `fund`: Fund your wallet address with TestNet ALGOs. * `refund`: Refund ALGOs back to the dispenser wallet address. * `limit`: Get information about current fund limits on your account. ### API Documentation For detailed API documentation, visit the documentation. ### CI Access Token All dispenser commands can work in CI mode by using a CI access token that can be generated by passing `--ci` flag to `login` command. Once a token is obtained, setting the value to the following environment variable `ALGOKIT_DISPENSER_ACCESS_TOKEN` will enable CI mode for all dispenser commands. If both a user mode and CI mode access token is available, the CI mode will take precedence. ## Login ```zsh $ algokit dispenser login [OPTIONS] ``` This command logs you into your Dispenser API account if you are not already logged in. Options * `--ci`: Generate an access token for CI. Issued for 30 days. * `--output`, -o: Output mode where you want to store the generated access token. Defaults to stdout. Only applicable when —ci flag is set. * `--file`, -f: Output filename where you want to store the generated access token. Defaults to `ci_token.txt`. Only applicable when —ci flag is set and —output mode is `file`. > Please note, algokit relies on for storing your API credentials. This implies that your credentials are stored in your system’s keychain. By default it will prompt for entering your system password unless you have set it up to always allow access for `algokit-cli` to obtain API credentials. ## Logout ```zsh $ algokit dispenser logout ``` This command logs you out of your Dispenser API account if you are logged in. ## Fund ```zsh $ algokit dispenser fund [OPTIONS] ``` This command funds your wallet address with TestNet ALGOs. Options * `--receiver`, -r: Receiver or address to fund with TestNet ALGOs. This option is required. * `--amount`, -a: Amount to fund. Defaults to microAlgos. This option is required. * `--whole-units`: Use whole units (Algos) instead of smallest divisible units (microAlgos). Disabled by default. ## Refund ```zsh $ algokit dispenser refund [OPTIONS] ``` This command refunds ALGOs back to the dispenser wallet address. Options * `--txID`, -t: Transaction ID of your refund operation. This option is required. The receiver address of the transaction must be the same as the dispenser wallet address that you can obtain by observing a `sender` field of transaction. > Please note, performing a refund operation will not immedately change your daily fund limit. Your daily fund limit is reset daily at midnigth UTC. If you have reached your daily fund limit, you will not be able to perform a refund operation until your daily fund limit is reset. ## Limit ```zsh $ algokit dispenser limit [OPTIONS] ``` This command gets information about current fund limits on your account. The limits reset daily. Options * `--whole-units`: Use whole units (Algos) instead of smallest divisible units (microAlgos). Disabled by default. ## Further Reading For in-depth details, visit the in the AlgoKit CLI reference documentation.
# AlgoKit Doctor
The AlgoKit Doctor feature allows you to check your AlgoKit installation along with its dependencies. This is useful for diagnosing potential issues with using AlgoKit. ## Functionality The AlgoKit Doctor allows you to make sure that your system has the correct dependencies installed and that they satisfy the minimum required versions. All passed checks will appear in your command line natural color while warnings will be in yellow (warning) and errors or missing critical services will be in red (error). The critical services that AlgoKit will check for (since they are ): Docker, docker compose and git. Please run this command to if you are facing an issue running AlgoKit. It is recommended to run it before . You can copy the contents of the Doctor command message (in Markdown format) to your clipboard by providing the `-c` flag to the command as follows `algokit doctor -c`. > NOTE: You can also use the `--verbose` or `-v` flag to show additional information including package dependencies of the AlgoKit CLI: `algokit -v doctor`. This only works when `algokit` is installed as a Python package (e.g., via `pipx install algokit`). # Examples For example, running `algokit doctor` with all prerequisites installed will result in output similar to the following: ```plaintext $ ~ algokit doctor timestamp: 2023-03-29T03:58:05+00:00 AlgoKit: 0.6.0 AlgoKit Python: 3.11.2 (main, Mar 24 2023, 00:16:47) [Clang 14.0.0 (clang-1400.0.29.202)] (location: /Users/algokit/.local/pipx/venvs/algokit) OS: macOS-13.2.1-arm64-arm-64bit docker: 20.10.22 docker compose: 2.15.1 git: 2.39.1 python: 3.10.9 (location: /Users/algokit/.asdf/shims/python) python3: 3.10.9 (location: /Users/algokit/.asdf/shims/python3) pipx: 1.2.0 poetry: 1.3.2 node: 18.12.1 npm: 8.19.2 brew: 4.0.10-34-gb753315 If you are experiencing a problem with AlgoKit, feel free to submit an issue via: https://github.com/algorandfoundation/algokit-cli/issues/new Please include this output, if you want to populate this message in your clipboard, run `algokit doctor -c` ``` The doctor command will indicate if there is any issues to address, for example: If AlgoKit detects a newer version, this will be indicated next to the AlgoKit version ```plaintext AlgoKit: 1.2.3 (latest: 4.5.6) ``` If the detected version of docker compose is unsupported, this will be shown: ```plaintext docker compose: 2.1.3 Docker Compose 2.5.0 required to run `algokit localnet command`; install via https://docs.docker.com/compose/install/ ``` For more details about the `AlgoKit doctor` command, please refer to the .
# AlgoKit explore
AlgoKit provides a quick shortcut to various Algorand networks using including ! ## LocalNet The following three commands are all equivalent and will open lora pointing to the local instance: * `algokit explore` * `algokit explore localnet` * `algokit localnet explore` ## Testnet `algokit explore testnet` will open lora pointing to TestNet via the . ## Mainnet `algokit explore mainnet` will open lora pointing to MainNet via the . To learn more about the `algokit explore` command, please refer to in the AlgoKit CLI reference documentation.
# AlgoKit Generate
The `algokit generate` is used to generate components used in an AlgoKit project. It also allows for custom generate commands which are loaded from the .algokit.toml file in your project directory. ## 1. Typed clients The `algokit generate client` can be used to generate a typed client from an or application specification with both Python and TypeScript available as target languages. ### Prerequisites To generate Python clients an installation of pip and pipx is required. To generate TypeScript clients an installation of Node.js and npx is also required. Each generated client will also have a dependency on `algokit-utils` libraries for the target language. ### Input file / directory You can either specify a path to an ARC-0032 JSON file, an ARC-0056 JSON file or to a directory that is recursively scanned for `application.json`, `*.arc32.json`, `*.arc56.json` file(s). ### Output tokens The output path is interpreted as relative to the current working directory, however an absolute path may also be specified e.g. `algokit generate client application.json --output /absolute/path/to/client.py` There are two tokens available for use with the `-o`, `--output` : * `{contract_name}`: This will resolve to a name based on the ARC-0032/ARC-0056 contract name, formatted appropriately for the target language. * `{app_spec_dir}`: This will resolve to the parent directory of the `application.json`, `*.arc32.json`, `*.arc56.json` file which can be useful to output a client relative to its source file. ### Version Pinning If you want to ensure typed client output stability across different environments and additionally protect yourself from any potential breaking changes introduced in the client generator packages, you can specify a version you’d like to pin to. To make use of this feature, pass `-v`, `--version`, for example `algokit generate client --version 1.2.3 path/to/application.json`. Alternatively, you can achieve output stability by installing the underlying or client generator package either locally in your project (via `poetry` or `npm` respectively) or globally on your system (via `pipx` or `npm` respectively). AlgoKit will search for a matching installed version before dynamically resolving. ### Usage Usage examples of using a generated client are below, typed clients allow your favourite IDE to provide better intellisense to provide better discoverability of available operations and parameters. #### Python ```python # A similar working example can be seen in the algokit python template, when using Python deployment from smart_contracts.artifacts.HelloWorldApp.client import ( HelloWorldAppClient, ) app_client = HelloWorldAppClient( algod_client, creator=deployer, indexer_client=indexer_client, ) deploy_response = app_client.deploy( on_schema_break=OnSchemaBreak.ReplaceApp, on_update=OnUpdate.UpdateApp, allow_delete=True, allow_update=True, ) response = app_client.hello(name="World") ``` #### TypeScript ```typescript // A similar working example can be seen in the algokit python template with typescript deployer, when using TypeScript deployment import { HelloWorldAppClient } from "./artifacts/HelloWorldApp/client"; const appClient = new HelloWorldAppClient( { resolveBy: "creatorAndName", findExistingUsing: indexer, sender: deployer, creatorAddress: deployer.addr, }, algod ); const app = await appClient.deploy({ allowDelete: isLocal, allowUpdate: isLocal, onSchemaBreak: isLocal ? "replace" : "fail", onUpdate: isLocal ? "update" : "fail", }); const response = await appClient.hello({ name: "world" }); ``` ### Examples To output a single application.json to a python typed client: `algokit generate client path/to/application.json --output client.py` To process multiple application.json in a directory structure and output to a typescript client for each in the current directory: `algokit generate client smart_contracts/artifacts --output {contract_name}.ts` To process multiple application.json in a directory structure and output to a python client alongside each application.json: `algokit generate client smart_contracts/artifacts --output {app_spec_path}/client.py` ## 2. Using Custom Generate Commands Custom generate commands are defined in the `.algokit.toml` file within the project directory, typically supplied by community template builders or official AlgoKit templates. These commands are specified under the `generate` key and serve to execute a generator at a designated path with provided answer key/value pairs. ### Understanding `Generators` A `generator` is essentially a compact, self-sufficient `copier` template. This template can optionally be defined within the primary `algokit templates` to offer supplementary functionality after a project is initialized from the template. For instance, the official provides a generator within the `.algokit/generators` directory. This generator can be employed for executing extra tasks on AlgoKit projects that have been initiated from this template, such as adding new smart contracts to an existing project. For a comprehensive explanation, please refer to the . ### Requirements To utilize custom generate commands, you must have `copier` installed. This installation is included by default in the AlgoKit CLI. Therefore, no additional installation is necessary if you have already installed the `algokit cli`. ### How to Use A custom command can be defined in the `.algokit.toml` as shown: ```toml [generate.my_generator] path = "path/to/my_generator" description = "A brief description of the function of my_generator" ``` Following this, you can execute the command as follows: `algokit generate my_generator --answer key value --path path/to/my_generator` If no `path` is given, the command will use the path specified in the `.algokit.toml`. If no `answer` is provided, the command will initiate an interactive `copier` prompt to request answers (similar to `algokit init`). The custom command employs the `copier` library to duplicate the files from the generator’s path to the current working directory, substituting any values from the `answers` dictionary. ### Examples As an example, let’s use the `smart-contract` generator from the `algokit-python-template` to add new contract to an existing project based on that template. The `smart-contract` generator is defined as follows: ```toml [algokit] min_version = "v1.3.1" ... # other keys [generate.smart_contract] description = "Adds a new smart contract to the existing project" path = ".algokit/generators/create_contract" ``` To execute this generator, ensure that you are operating from the same directory as the `.algokit.toml` file, and then run: ```bash $ algokit generate # The output will be as follows: # Note how algokit dynamically injects a new `smart-contract` command based # on the `.algokit.toml` file Usage: algokit generate [OPTIONS] COMMAND [ARGS]... Generate code for an Algorand project. Options: -h, --help Show this message and exit. Commands: client Create a typed ApplicationClient from an ARC-32 application.json smart-contract Adds a new smart contract to the existing project ``` To execute the `smart-contract` generator, run: ```bash $ algokit generate smart-contract # or $ algokit generate smart-contract -a contract_name "MyCoolContract" ``` #### Third Party Generators It is important to understand that by default, AlgoKit will always prompt you before executing a generator to ensure it’s from a trusted source. If you are confident about the source of the generator, you can use the `--force` or `-f` option to execute the generator without this confirmation prompt. Be cautious while using this option and ensure the generator is from a trusted source. At the moment, a trusted source for a generator is defined as *a generator that is included in the official AlgoKit templates (e.g. `smart-contract` generator in `algokit-python-template`)*
# AlgoKit goal
AlgoKit goal command provides the user with a mechanism to run commands against the current . You can explore all possible goal commands by running `algokit goal` e.g.: ```plaintext $ ~ algokit goal GOAL is the CLI for interacting Algorand software instance. The binary 'goal' is installed alongside the algod binary and is considered an integral part of the complete installation. The binaries should be used in tandem - you should not try to use a version of goal with a different version of algod. Usage: goal [flags] goal [command] Available Commands: account Control and manage Algorand accounts app Manage applications asset Manage assets clerk Provides the tools to control transactions completion Shell completion helper help Help about any command kmd Interact with kmd, the key management daemon ledger Access ledger-related details license Display license information logging Control and manage Algorand logging network Create and manage private, multi-node, locally-hosted networks node Manage a specified algorand node protocols report version The current version of the Algorand daemon (algod) wallet Manage wallets: encrypted collections of Algorand account keys Flags: -d, --datadir stringArray Data directory for the node -h, --help help for goal -k, --kmddir string Data directory for kmd -v, --version Display and write current build version and exit Use "goal [command] --help" for more information about a command. ``` For instance, running `algokit goal report` would result in output like: ```plaintext $ ~ algokit goal report 12885688322 3.12.2.dev [rel/stable] (commit #181490e3) go-algorand is licensed with AGPLv3.0 source code available at https://github.com/algorand/go-algorand Linux ff7828f2da17 5.15.49-linuxkit #1 SMP PREEMPT Tue Sep 13 07:51:32 UTC 2022 aarch64 GNU/Linux Genesis ID from genesis.json: sandnet-v1 Last committed block: 0 Time since last block: 0.0s Sync Time: 0.0s Last consensus protocol: future Next consensus protocol: future Round for next consensus protocol: 1 Next consensus protocol supported: true Last Catchpoint: Genesis ID: sandnet-v1 Genesis hash: vEg1NCh6SSXwS6O5HAfjYCCNAs4ug328s3RYMr9syBg= ``` If the AlgoKit Sandbox `algod` docker container is not present or not running, the command will fail with a clear error, e.g.: ```plaintext $ ~ algokit goal Error: No such container: algokit_algod Error: Error executing goal; ensure the Sandbox is started by executing `algokit sandbox status` ``` ```plaintext $ ~ algokit goal Error response from daemon: Container 5a73961536e2c98e371465739053d174066c40d00647c8742f2bb39eb793ed7e is not running Error: Error executing goal; ensure the Sandbox is started by executing `algokit sandbox status` ``` ## Working with Files in the Container When interacting with the container, especially if you’re using tools like goal, you might need to reference files or directories. Here’s how to efficiently deal with files and directories: ### Automatic File Mounting When you specify a file or directory path in your `goal` command, the system will automatically mount that path from your local filesystem into the container. This way, you don’t need to copy files manually each time. For instance, if you want to compile a `teal` file: ```plaintext algokit goal clerk compile /Path/to/inputfile/approval.teal -o /Path/to/outputfile/approval.compiled ``` Here, `/Path/to/inputfile/approval.teal` and `/Path/to/outputfile/approval.compiled` are paths on your local file system, and they will be automatically accessible to the `goal` command inside the container. ### Manual Copying of Files In case you want to manually copy files into the container, you can do so using `docker cp`: ```plaintext docker cp foo.txt algokit_algod:/root ``` This command copies the `foo.txt` from your local system into the root directory of the `algokit_algod` container. Note: Manual copying is optional and generally only necessary if you have specific reasons for doing so since the system will auto-mount paths specified in commands. ## Running multiple commands If you want to run multiple commands or interact with the filesystem you can execute `algokit goal --console`. This will open a shell session on the `algod` Docker container and from there you can execute goal directly, e.g.: ```bash $ algokit goal --console Opening Bash console on the algod node; execute `exit` to return to original console root@82d41336608a:~# goal account list [online] C62QEFC7MJBPHAUDMGVXGZ7WRWFAF3XYPBU3KZKOFHYVUYDGU5GNWS4NWU C62QEFC7MJBPHAUDMGVXGZ7WRWFAF3XYPBU3KZKOFHYVUYDGU5GNWS4NWU 4000000000000000 microAlgos [online] DVPJVKODAVEKWQHB4G7N6QA3EP7HKAHTLTZNWMV4IVERJQPNGKADGURU7Y DVPJVKODAVEKWQHB4G7N6QA3EP7HKAHTLTZNWMV4IVERJQPNGKADGURU7Y 4000000000000000 microAlgos [online] 4BH5IKMDDHEJEOZ7T5LLT4I7EVIH5XCOTX3TPVQB3HY5TUBVT4MYXJOZVA 4BH5IKMDDHEJEOZ7T5LLT4I7EVIH5XCOTX3TPVQB3HY5TUBVT4MYXJOZVA 2000000000000000 microAlgos ``` ## Interactive Mode Some `goal` commands require interactive input from the user. By default, AlgoKit will attempt to run commands in non-interactive mode first, and automatically switch to interactive mode if needed. You can force a command to run in interactive mode by using the `--interactive` flag: ```bash $ algokit goal --interactive wallet new algodev Please choose a password for wallet 'algodev': Please confirm the password: Creating wallet... Created wallet 'algodev' Your new wallet has a backup phrase that can be used for recovery. Keeping this backup phrase safe is extremely important. Would you like to see it now? (Y/n): n ``` This is particularly useful when you know a command will require user input, such as creating new accounts, importing keys, or signing transactions. For more details about the `AlgoKit goal` command, please refer to the .
# AlgoKit Init
The `algokit init` is used to quickly initialize new projects using official Algorand Templates or community provided templates. It supports a fully guided command line wizard experience, as well as fully scriptable / non-interactive functionality via command options. ## Quick start For a quick start template with all of the defaults you can run: `algokit init` which will interactively guide you through picking the right stack to build your AlgoKit project. Afterwards, you should immediately be able to hit F5 to compile the hello world smart contract to the `smart_contracts/artifacts` folder (with breakpoint debugging - try setting a breakpoint in `smart_contracts/helloworld.py`) and open the `smart_contracts/helloworld.py` file and get linting, automatic formatting and syntax highlighting. ## Prerequisites Git is a prerequisite for the init command as it is used to clone templates and initialize git repos. Please consult the for installation instructions. ## Functionality As outlined in , the simplest use of the command is to just run `algokit init` and you will then be guided through selecting a template and configuring options for that template. e.g. ```plaintext $ ~ algokit init ? Which of these options best describes the project you want to start? `Smart Contract` | `Dapp Frontend` | `Smart Contract & Dapp Frontend` | `Custom` ? Name of project / directory to create the project in: my-cool-app ``` Once above 2 questions are answered, the `cli` will start instantiating the project and will start asking questions specific to the template you are instantiating. By default official templates such as `python`, `typescript`, `fullstack`, `react`, `python` include a notion of a `preset`. If you want to skip all questions and let the tool preset the answers tailored for a starter project you can pick `Starter`, for a more advanced project that includes unit tests, CI automation and other advanced features, pick `Production`. Lastly, if you prefer to modify the experience and tailor the template to your needs, pick the `Custom` preset. If you want to accept the default for each option simply hit \[enter] or alternatively to speed things up you can run `algokit init --defaults` and they will be auto-accepted. ### Workspaces vs Standalone Projects AlgoKit supports two distinct project structures: Workspaces and Standalone Projects. This flexibility allows developers to choose the most suitable approach for their project’s needs. To initialize a project within a workspace, use the `--workspace` flag. If a workspace does not already exist, AlgoKit will create one for you by default (unless you disable it via `--no-workspace` flag). Once established, new projects can be added to this workspace, allowing for centralized management. To create a standalone project, use the `--no-workspace` flag during initialization. This instructs AlgoKit to bypass the workspace structure and set up the project as an isolated entity. For more details on workspaces and standalone projects, refer to the . ## Bootstrapping You will also be prompted if you wish to run the command, this is useful if you plan to immediately begin developing in the new project. If you passed in `--defaults` or `--bootstrap` then it will automatically run bootstrapping unless you passed in `--no-bootstrap`. ```plaintext ? Do you want to run `algokit bootstrap` to bootstrap dependencies for this new project so it can be run immediately? Yes Installing Python dependencies and setting up Python virtual environment via Poetry poetry: Creating virtualenv my-smart-contract in /Users/algokit/algokit-init/my-smart-contract/.venv poetry: Updating dependencies poetry: Resolving dependencies... poetry: poetry: Writing lock file poetry: poetry: Package operations: 53 installs, 0 updates, 0 removals poetry: poetry: • Installing pycparser (2.21) ---- other output omitted for brevity ---- poetry: • Installing ruff (0.0.171) Copying /Users/algokit/algokit-init/my-smart-contract/smart_contracts/.env.template to /Users/algokit/algokit-init/my-smart-contract/smart_contracts/.env and prompting for empty values ? Would you like to initialise a git repository and perform an initial commit? Yes 🎉 Performed initial git commit successfully! 🎉 🙌 Project initialized at `my-smart-contract`! For template specific next steps, consult the documentation of your selected template 🧐 Your selected template comes from: ➡️ https://github.com/algorandfoundation/algokit-python-template As a suggestion, if you wanted to open the project in VS Code you could execute: > cd my-smart-contract && code . ``` After bootstrapping you are also given the opportunity to initialize a git repo, upon successful completion of the init command the project is ready to be used. If you pass in `--git` it will automatically initialise the git repository and if you pass in `--no-git` it won’t. > Please note, when using `--no-workspaces`, algokit init will assume a max lookup depth of 1 for a fresh template based project. Otherwise it will assume a max depth of 2, since default algokit workspace structure is at most 2 levels deep. ## Options There are a number of options that can be used to provide answers to the template prompts. Some of the options requiring further explanation are detailed below, but consult the CLI reference for all available . ## Community Templates As well as the official Algorand templates shown when running the init command, community templates can also be provided by providing a URL via the prompt or the `--template-url` option. e.g. `algokit init --template-url https://github.com/algorandfoundation/algokit-python-template` (that being the url of the official python template, the same as `algokit init -t python`). The `--template-url` option can be combined with `--template-url-ref` to specify a specific commit, branch or tag e.g. `algokit init --template-url https://github.com/algorandfoundation/algokit-python-template --template-url-ref 0232bb68a2f5628e910ee52f62bf13ded93fe672` If the URL is not an official template there is a potential security risk and so to continue you must either acknowledge this prompt, or if you are in a non-interactive environment you can pass the `--UNSAFE-SECURITY-accept-template-url` option (but we generally don’t recommend this option so users can review the warning message first) e.g. ```plaintext Community templates have not been reviewed, and can execute arbitrary code. Please inspect the template repository, and pay particular attention to the values of \_tasks, \_migrations and \_jinja_extensions in copier.yml ? Continue anyway? Yes ``` If you want to create a community template, you can use the and as a starting point. ## Template Answers Answers to specific template prompts can be provided with the `--answer {key} {value}` option, which can be used multiple times for each prompt. Quotes can be used for values with spaces e.g. `--answer author_name "Algorand Foundation"`. To find out the key for a specific answer you can either look at `.algokit/.copier-answers.yml` in the root folder of a project created via `algokit init` or in the `copier.yaml` file of a template repo e.g. for the . ## Non-interactive project initialization By combining a number of options, it is possible to initialize a new project without any interaction. For example, to create a project named `my-smart-contract` using the `python` template with no git, no bootstrapping, the author name of `Algorand Foundation`, and defaults for all other values, you could execute the following: ```plaintext $ ~ algokit init -n my-smart-contract -t python --no-git --no-bootstrap --answer author_name "Algorand Foundation" --defaults 🙌 Project initialized at `my-smart-contract`! For template specific next steps, consult the documentation of your selected template 🧐 Your selected template comes from: ➡️ https://github.com/algorandfoundation/algokit-python-template As a suggestion, if you wanted to open the project in VS Code you could execute: > cd my-smart-contract && code . ``` ## Initializing Examples AlgoKit provides a collection of pre-built example projects that you can use to quickly start development. These examples demonstrate various use cases and best practices for Algorand development. ### Using the Example Command You can initialize a new project from an example using the `algokit init example` command: ```bash # List and select from available examples interactively algokit init example #List the available examples algokit init example -l/--list # Initialize a specific example directly algokit init example ``` When run without an example ID, the command launches an interactive selector that displays available examples with their descriptions and categories. Examples are copied to a new directory in your current location, named after the example ID. ### Available Examples Examples are organized in the AlgoKit templates repository and cover various use cases including: * Smart contract examples * dApp frontend examples * Full-stack applications * Integration samples Each example comes with all necessary files and configurations to get started immediately. After initialization, you can navigate to the example directory and begin development. ### Exploring Example Code To explore what examples are available before initializing, you can run the interactive selector and browse through the options. Examples include a name and type to help you select the most appropriate one for your needs. After initializing an example, AlgoKit automatically attempts to open the project in your default IDE to help you quickly start exploring and modifying the code. For more details about the `AlgoKit init` command, please refer to the .
# AlgoKit LocalNet
The AlgoKit LocalNet feature allows you to manage (start, stop, reset, manage) a locally sandboxed private Algorand network. This allows you to interact and deploy changes against your own Algorand network without needing to worry about funding TestNet accounts, information you submit being publicly visible or being connected to an active Internet connection (once the network has been started). AlgoKit LocalNet uses Docker images that are optimised for a great dev experience. This means the Docker images are small and start fast. It also means that features suited to developers are enabled such as KMD (so you can programmatically get faucet private keys). The philosophy we take with AlgoKit LocalNet is that you should treat it as an ephemeral network. This means assume it could be reset at any time - don’t store data on there that you can’t recover / recreate. We have optimised the AlgoKit LocalNet experience to minimise situations where the network will get reset to improve the experience, but it can and will still happen in a number of situations. > For details on executing `algokit localnet` without `docker` or `podman` refer to the section. ## Prerequisites AlgoKit LocalNet relies on Docker and Docker Compose being present and running on your system. Alternatively, you can use Podman as a replacement for Docker see . You can install Docker by following the . Most of the time this will also install Docker Compose, but if not you can for that too. If you are on Windows then you will need WSL 2 installed first, for which you can find the . If you are using Windows 10 then ensure you are on the latest version to reduce likelihood of installation problems. Alternatively, the Windows 10/11 Pro+ supported for Docker can be used instead of the WSL 2 backend. ### Podman support If you prefer to use as your container engine, make sure to install and configure Podman first. Then you can set the default container engine that AlgoKit will use, by running: `algokit config container-engine podman`. See for more details. ## Known issues The AlgoKit LocalNet is built with 30,000 participation keys generated and after 30,000 rounds is reached it will no longer be able to add rounds. At this point you can simply reset the LocalNet to continue development. Participation keys are slow to generate hence why they are pre-generated to improve experience. ## Supported operating environments We rely on the official Algorand docker images for Indexer, Conduit and Algod, which means that AlgoKit LocalNet is supported on Windows, Linux and Mac on Intel and AMD chipsets (including Apple Silicon). ## Container-based LocalNet AlgoKit cli supports both and as container engines. While `docker` is used by default, executing the below: ```plaintext algokit config container-engine # or algokit config container-engine podman|docker ``` Will set the default container engine to use when executing `localnet` related commands via `subprocess`. ### Creating / Starting the LocalNet To create / start your AlgoKit LocalNet instance you can run `algokit localnet start`. This will: * Detect if you have Docker and Docker Compose installed * Detect if you have the Docker engine running * Create a new Docker Compose deployment for AlgoKit LocalNet if it doesn’t already exist * (Re-)Start the containers You can also specify additional options: * `--name`: Specify a name for a custom LocalNet instance. This allows you to have multiple LocalNet configurations. Refer to for more details. * `--config-dir`: Specify a custom configuration directory for the LocalNet. * `--dev/--no-dev`: Control whether to launch ‘algod’ in developer mode or not. Defaults to ‘yes’ (developer mode enabled). If it’s the first time running it on your machine then it will download the following images from DockerHub: * (\~500 MB) * (\~96 MB) * (\~98 MB) * (\~80 MB) Once they have downloaded, it won’t try and re-download images unless you perform a `algokit localnet reset`. Once the LocalNet has started, the following endpoints will be available: * : * address: * token: `aaaaaaaaaaaaaaaaaaaaaaaaaaaaaaaaaaaaaaaaaaaaaaaaaaaaaaaaaaaaaaaa` * : * address: * token: `aaaaaaaaaaaaaaaaaaaaaaaaaaaaaaaaaaaaaaaaaaaaaaaaaaaaaaaaaaaaaaaa` * : * address: * tealdbg port: * address: ### Creating / Starting a Named LocalNet AlgoKit manages the default LocalNet environment and automatically keeps the configuration updated with any upstream changes. As a result, configuration changes are reset automatically by AlgoKit, so that developers always have access to a known good LocalNet configuration. This works well for the majority of scenarios, however sometimes developers need the control to make specific configuration changes for specific scenarios. When you want more control, named LocalNet instances can be used by running `algokit localnet start --name {name}`. This command will set up and run a named LocalNet environment (based off the default), however AlgoKit will not update the environment or configuration automatically. From here developers are able to modify their named environment in any way they like, for example setting `DevMode: false` in `algod_network_template.json`. Once you have a named LocalNet running, the AlgoKit LocalNet commands will target this instance. If at any point you’d like to switch back to the default LocalNet, simply run `algokit localnet start`. ### Specifying a custom LocalNet configuration directory You can specify a custom LocalNet configuration directory by using the `--config-dir` option or by setting the `ALGOKIT_LOCALNET_CONFIG_DIR` environment variable. This allows you to have multiple LocalNet instances with different configurations in different directories, which is useful in ‘CI/CD’ scenarios where you can save your custom localnet in your version control and then run `algokit localnet start --config-dir /path/to/custom/config` to use it within your pipeline. For example, to create a LocalNet instance with a custom configuration directory, you can run: ```plaintext algokit localnet start --config-dir /path/to/custom/config ``` ### Named LocalNet Configuration Directory When running `algokit localnet start --name {name}`, AlgoKit stores configuration files in a specific directory on your system. The location of this directory depends on your operating system: * **Windows**: We use the value of the `APPDATA` environment variable to determine the directory to store the configuration files. This is usually `C:\Users\USERNAME\AppData\Roaming`. * **Linux or Mac**: We use the value of the `XDG_CONFIG_HOME` environment variable to determine the directory to store the configuration files. If `XDG_CONFIG_HOME` is not set, the default location is `~/.config`. Assuming you have previously used a default LocalNet, the path `./algokit/sandbox/` will exist inside the configuration directory, containing the configuration settings for the default LocalNet instance. Additionally, for each named LocalNet instance you have created, the path `./algokit/sandbox_{name}/` will exist, containing the configuration settings for the respective named LocalNet instances. It is important to note that only the configuration files for a named LocalNet instance should be changed. Any changes made to the default LocalNet instance will be reverted by AlgoKit. You can use `--name` flag along with `--config-dir` option to specify a custom path for the LocalNet configuration directory. This allows you to manage multiple LocalNet instances with different configurations in different directories on your system. ### Controlling Algod Developer Mode By default, AlgoKit LocalNet starts algod in developer mode. This mode enables certain features that are useful for development but may not reflect the behavior of a production network. You can control this setting using the `--dev/--no-dev` flag when starting the LocalNet: ```bash algokit localnet start --no-dev # Starts algod without developer mode algokit localnet start --dev # Starts algod with developer mode (default) ``` If you change this setting for an existing LocalNet instance, AlgoKit will prompt you to restart the LocalNet to apply the changes. ### Stopping and Resetting the LocalNet To stop the LocalNet you can execute `algokit localnet stop`. This will turn off the containers, but keep them ready to be started again in the same state by executing `algokit localnet start`. To reset the LocalNet you can execute `algokit localnet reset`, which will tear down the existing containers, refresh the container definition from the latest stored within AlgoKit and update to the latest Docker images. If you want to keep the same container spec and versions as you currently have, but quickly tear down and start a new instance then run `algokit localnet reset --no-update`. ### Viewing transactions in the LocalNet You can see a web-based user interface of the current state of your LocalNet including all transactions by using the feature, e.g. by executing `algokit localnet explore`. ### Executing goal commands against AlgoKit LocalNet See the feature. You can also execute `algokit localnet console` to open a . Note: if you want to copy files into the container so you can access them via goal then you can use the following: ```plaintext docker cp foo.txt algokit_algod:/root ``` ### Getting access to the private key of the faucet account If you want to use the LocalNet then you need to get the private key of the initial wallet so you can transfer ALGOs out of it to other accounts you create. There are two ways to do this: **Option 1: Manually via goal** ```plaintext algokit goal account list algokit goal account export -a {address_from_an_online_account_from_above_command_output} ``` **Option 2: Automatically via kmd API** Needing to do this manual step every time you spin up a new development environment or reset your LocalNet is frustrating. Instead, it’s useful to have code that uses the Sandbox APIs to automatically retrieve the private key of the default account. AlgoKit Utils provides methods to help you do this: * TypeScript - and * Python - and For more details about the `AlgoKit localnet` command, please refer to the . ## GitHub Codespaces-based LocalNet The AlgoKit LocalNet feature also supports running the LocalNet in a GitHub Codespace with port forwarding by utilizing the . This allows you to run the LocalNet without the need to use Docker. This is especially useful for scenarios where certain hardware or software limitations may prevent you from being able to run Docker. To run the LocalNet in a GitHub Codespace, you can use the `algokit localnet codespace` command. By default without `--force` flag it will prompt you to delete stale codespaces created earlier (if any). Upon termination it will also prompt to delete the codespace that was used prior to termination. Running an interactive session ensures that you have control over the lifecycle of your Codespace, preventing unnecessary usage and potential costs. GitHub Codespaces offers a free tier with certain limits, which you can review in the . ### Options * `-m`, `--machine`: Specifies the GitHub Codespace machine type to use. Defaults to `basicLinux32gb`. Available options are `basicLinux32gb`, `standardLinux32gb`, `premiumLinux`, and `largePremiumLinux`. Refer to for more details. * `-a`, `--algod-port`: Sets the port for the Algorand daemon. Defaults to `4001`. * `-i`, `--indexer-port`: Sets the port for the Algorand indexer. Defaults to `8980`. * `-k`, `--kmd-port`: Sets the port for the Algorand kmd. Defaults to `4002`. * `-n`, `--codespace-name`: Specifies the name of the codespace. Defaults to a random name with a timestamp. * `-t`, `--timeout`: Max duration for running the port forwarding process. Defaults to 1 hour. This timeout ensures the codespace **will automatically shut down** after the specified duration to prevent accidental overspending of free quota on GitHub Codespaces. . * `-r`, `--repo-url`: The URL of the repository to use. Defaults to the AlgoKit base template repository (`algorandfoundation/algokit-base-template`). The reason why algokit-base-template is used by default is due to which defines the scripts that take care of setting up AlgoKit CLI during container start. You can use any custom repo as a base, however it’s important to ensure the reference file exists in your repository **otherwise there will be no ports to forward from the codespace**. * `--force`, `-f`: Force deletes stale codespaces and skips confirmation prompts. Defaults to explicitly prompting for confirmation. For more details about managing LocalNet in GitHub Codespaces, please refer to the . > Tip: By specifying alternative port values it is possible to have several LocalNet instances running where one is using default ports via `algokit localnet start` with Docker | Podman and the other relies on port forwarding via `algokit localnet codespace`.
# AlgoKit CLI Overview
The Algorand AlgoKit CLI is the one-stop shop tool for developers building on the Algorand network. The goal of AlgoKit is to help developers build and launch secure, automated production-ready applications rapidly. ## AlgoKit CLI commands For details on how to use individual features see the following * \- Bootstrap AlgoKit project dependencies * \- Compile Algorand Python code * \- Install shell completions for AlgoKit * \- Deploy your smart contracts effortlessly to various networks * \- Fund your TestNet account with ALGOs from the AlgoKit TestNet Dispenser * \- Check AlgoKit installation and dependencies * \- Explore Algorand Blockchains using lora * \- Generate code for an Algorand project * \- Run the Algorand goal CLI against the AlgoKit Sandbox * \- Quickly initialize new projects using official Algorand Templates or community provided templates * \- Manage a locally sandboxed private Algorand network * \- Manage an AlgoKit project workspace on your file system * \- Perform a variety of useful operations on the Algorand blockchain ## Common AlgoKit CLI options AlgoKit has a number of global options that can impact all commands. Note: these global options must be appended to `algokit` and appear before a command, e.g. `algokit -v localnet start`, but not `algokit localnet start -v`. The exception to this is `-h`, which can be appended to any command or sub-command to see contextual help information. * `-h, --help` The help option can be used on any command to get details on any command, its sub-commands and options. * `-v, --verbose` Enables DEBUG logging, useful when troubleshooting or if you want to peek under the covers and learn what AlgoKit CLI is doing. * `--color / --no-color` Enables or disables output of console styling, we also support the environment variable. * `--skip-version-check` Skips updated AlgoKit version checking and prompting for that execution, this can also be disabled with `algokit config version-prompt disable`. See also the , which details every command, sub-command and option. ## AlgoKit Tutorials The following tutorials guide you through various scenarios: ## Guiding Principles AlgoKit is guided by the following solution principles which flow through to the applications created by developers. 1. **Cohesive developer tool suite**: Using AlgoKit should feel professional and cohesive, like it was designed to work together, for the developer; not against them. Developers are guided towards delivering end-to-end, high quality outcomes on MainNet so they and Algorand are more likely to be successful. 2. **Seamless onramp**: New developers have a seamless experience to get started and they are guided into a pit of success with best practices, supported by great training collateral; you should be able to go from nothing to debugging code in 5 minutes. 3. **Leverage existing ecosystem**: AlgoKit functionality gets into the hands of Algorand developers quickly by building on top of the existing ecosystem wherever possible and aligned to these principles. 4. **Sustainable**: AlgoKit should be built in a flexible fashion with long-term maintenance in mind. Updates to latest patches in dependencies, Algorand protocol development updates, and community contributions and feedback will all feed in to the evolution of the software. 5. **Secure by default**: Include defaults, patterns and tooling that help developers write secure code and reduce the likelihood of security incidents in the Algorand ecosystem. This solution should help Algorand be the most secure Blockchain ecosystem. 6. **Extensible**: Be extensible for community contribution rather than stifling innovation, bottle-necking all changes through the Algorand Foundation and preventing the opportunity for other ecosystems being represented (e.g. Go, Rust, etc.). This helps make developers feel welcome and is part of the developer experience, plus it makes it easier to add features sustainably. 7. **Meet developers where they are**: Make Blockchain development mainstream by giving all developers an idiomatic development experience in the operating system, IDE and language they are comfortable with so they can dive in quickly and have less they need to learn before being productive. 8. **Modular components**: Solution components should be modular and loosely coupled to facilitate efficient parallel development by small, effective teams, reduced architectural complexity and allowing developers to pick and choose the specific tools and capabilities they want to use based on their needs and what they are comfortable with.
# AlgoKit Project
`algokit project` is a collection of commands and command groups useful for managing algokit compliant . ## Overview The `algokit project` command group is designed to simplify the management of AlgoKit projects. It provides a suite of tools to initialize, deploy, link, list, and run various components within a project workspace. This command group ensures that developers can efficiently handle the lifecycle of their projects, from bootstrapping to deployment and beyond. ### What is a Project? In the context of AlgoKit, a “project” refers to a structured standalone or monorepo workspace that includes all the necessary components for developing, testing, and deploying Algorand applications. This may include smart contracts, frontend applications, and any associated configurations. In the context of the CLI, the `algokit project` commands help manage these components cohesively. The orchestration between workspaces, standalone projects, and custom commands is designed to provide a seamless development experience. Below is a high-level overview of how these components interact within the AlgoKit ecosystem. ```mermaid graph TD; A[`algokit project` command group] --> B["Workspace (.algokit.toml)"]; A --> C["Standalone Project (.algokit.toml)"]; B --> D["Sub-Project 1 (.algokit.toml)"]; B --> E["Sub-Project 2 (.algokit.toml)"]; C --> F["Custom Commands defined in .algokit.toml"]; D --> F; E --> F; ``` * **AlgoKit Project**: The root command that encompasses all project-related functionalities. * **Workspace**: A root folder that is managing multiple related sub-projects. * **Standalone Project**: An isolated project structure for simpler applications. * **Custom Commands**: Commands defined by the user in the `.algokit.toml` and automatically injected into the `algokit project run` command group. ### Workspaces vs Standalone Projects As mentioned, AlgoKit supports two distinct project structures: Workspaces and Standalone Projects. This flexibility allows developers to choose the most suitable approach for their project’s needs. ### Workspaces Workspaces are designed for managing multiple related projects under a single root directory. This approach is beneficial for complex applications that consist of multiple sub-projects, such as a smart contract and a corresponding frontend application. Workspaces help in organizing these sub-projects in a structured manner, making it easier to manage dependencies and shared configurations. To initialize a project within a workspace, use the `--workspace` flag. If a workspace does not already exist, AlgoKit will create one for you by default (unless you disable it via `--no-workspace` flag). Once established, new projects can be added to this workspace, allowing for centralized management. To mark your project as `workspace` fill in the following in your `.algokit.toml` file: ```toml [project] type = 'workspace' # type specifying if the project is a workspace or standalone projects_root_path = 'projects' # path to the root folder containing all sub-projects in the workspace ``` #### VSCode optimizations AlgoKit has a set of minor optimizations for VSCode users that are useful to be aware of: * Templates created with the `--workspace` flag automatically include a VSCode code-workspace file. New projects added to an AlgoKit workspace are also integrated into an existing VSCode workspace. * Using the `--ide` flag with `init` triggers automatic prompts to open the project and, if available, the code workspace in VSCode. #### Handling of the `.github` Folder A key aspect of using the `--workspace` flag is how the `.github` folder is managed. This folder, which contains GitHub-specific configurations such as workflows and issue templates, is moved from the project directory to the root of the workspace. This move is necessary because GitHub does not recognize workflows located in subdirectories. Here’s a simplified overview of what happens: 1. If a `.github` folder is found in your project, its contents are transferred to the workspace’s root `.github` folder. 2. Files with matching names in the destination are not overwritten; they’re skipped. 3. The original `.github` folder is removed if it’s left empty after the move. 4. A notification is displayed, advising you to review the moved `.github` contents to ensure everything is in order. This process ensures that your GitHub configurations are properly recognized at the workspace level, allowing you to utilize GitHub Actions and other features seamlessly across your projects. ### Standalone Projects Standalone projects are suitable for simpler applications or when working on a single component. This structure is straightforward, with each project residing in its own directory, independent of others. Standalone projects are ideal for developers who prefer simplicity or are focusing on a single aspect of their application and are sure that they will not need to add more sub-projects in the future. To create a standalone project, use the `--no-workspace` flag during initialization. This instructs AlgoKit to bypass the workspace structure and set up the project as an isolated entity. Both workspaces and standalone projects are fully supported by AlgoKit’s suite of tools, ensuring developers can choose the structure that best fits their workflow without compromising on functionality. To mark your project as a standalone project fill in the following in your `.algokit.toml` file: ```toml [project] type = {'backend' | 'contract' | 'frontend'} # currently support 3 generic categories for standalone projects name = 'my-project' # unique name for the project inside workspace ``` > We recommend using workspaces for most projects (hence enabled by default), as it provides a more organized and scalable approach to managing multiple sub-projects. However, standalone projects are a great choice for simple applications or when you are certain that you will not need to add more sub-projects in the future, for such cases simply append `--no-workspace` when using `algokit init` command. For more details on init command please refer to command docs. ## Features Dive into the features of the `algokit project` command group: * \- Bootstrap your project with AlgoKit. * \- Deploy your smart contracts effortlessly to various networks. * \- Powerful feature designed to streamline the integration between `frontend` and `contract` projects * \- Enumerate all projects within an AlgoKit workspace. * \- Define custom commands and manage their execution via `algokit` cli.
# AlgoKit Project Bootstrap
The AlgoKit Project Bootstrap feature allows you to bootstrap different project dependencies by looking up specific files in your current directory and immediate sub directories by convention. This is useful to allow for expedited initial setup for each developer e.g. when they clone a repository for the first time. It’s also useful to provide a quick getting started experience when initialising a new project via and meeting our goal of “nothing to debugging code in 5 minutes”. It can bootstrap one or all of the following (with other options potentially being added in the future): * Python projects - Supports Poetry and uv package managers. Installs the configured package manager if not present and runs the appropriate install command. * JavaScript/Node.js projects - Supports npm and pnpm package managers. Runs the appropriate install command for the configured package manager. * dotenv (.env) file - Checks for `.env.template` files, copies them to `.env` (which should be in `.gitignore` so developers can safely make local specific changes) and prompts for any blank values (so the developer has an easy chance to fill in their initial values where there isn’t a clear default). > **Note**: Invoking bootstrap from `algokit bootstrap` is not recommended. Please prefer using `algokit project bootstrap` instead. You can configure which package managers are used by default via: * `algokit config py-package-manager` - Configure Python package manager (poetry or uv) * `algokit config js-package-manager` - Configure JavaScript package manager (npm or pnpm) For more details, see the . ## Package Manager Override You can override the default package manager settings on a per-project basis by adding configuration to your project’s `.algokit.toml` file: ```toml [package_manager] python = "uv" # Override Python package manager (poetry or uv) javascript = "pnpm" # Override JavaScript package manager (npm or pnpm) ``` This project-specific configuration takes precedence over your global settings, allowing different projects to use different package managers as needed. ### Configuration Precedence The bootstrap command follows this precedence order when determining which package manager to use: 1. **Project override** - Configuration in `.algokit.toml` (highest priority) 2. **User preference** - Global configuration set via `algokit config` (respects your explicit choice) 3. **Smart defaults** - Based on project structure (e.g., `poetry.toml` → Poetry, `pnpm-lock.yaml` → PNPM) 4. **Interactive prompt** - Asked on first use if no preference is set This means if you set a global preference (e.g., `algokit config py-package-manager uv`), it will be used across all projects unless explicitly overridden at the project level. Smart defaults only apply when you haven’t set a preference yet. ## Package Manager Command Translation During the bootstrap process, AlgoKit automatically translates package manager commands in your project’s `.algokit.toml` file to match your configured package manager preferences. This ensures that project run commands work correctly regardless of which package manager the template was originally created with. ### How It Works When you run `algokit project bootstrap`, if your project contains run commands in `.algokit.toml`, they will be automatically updated: * **JavaScript**: `npm` ↔ `pnpm` - Only semantically equivalent commands are translated * **Python**: `poetry` ↔ `uv` - Only semantically equivalent commands are translated ### JavaScript Translation (npm ↔ pnpm) **Commands that translate:** * `npm install` → `pnpm install` * `npm run